


Page 18
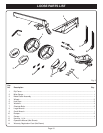
BLADE AND GUARD ASSEMBLY
WARNING:
Do not connect to power supply until assembly is complete.
Failure to comply could result in accidental starting and
possible serious injury.
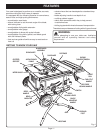
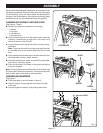
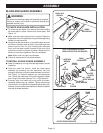
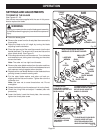
TO CHECK SAW BLADE INSTALLATION
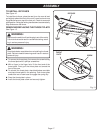
To check the saw blade, first remove the screw holding
the throat plate in place. Remove the throat plate.
See
Figure 14.
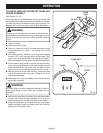
Make sure the bevel locking lever is locked. Raise the
blade arbor to its full height by turning the blade adjusting
handle counterclockwise.
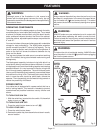
Using the smaller hex wrench, insert the flat open end into
the flats on the arbor shaft as shown. Insert the larger hex
wrench over the hex nut, and, holding both wrenches
firmly, pull the larger wrench forward to the front of the
machine to loosen and push to tighten. Make sure the
blade nut is securely tightened. Do not overtighten.
Note: Arbor shaft has right-hand threads.
Check all clearances for free blade rotation.
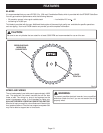
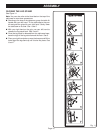
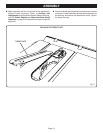
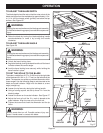
TO INSTALL BLADE GUARD ASSEMBLY
Lower the blade by turning the blade adjustment handle
clockwise.
Using the small hex wrench, install the blade guard
assembly by loosening the two attachment hex nuts
enough to slide the riving knife down between the shims.
See Figure 16.
Partially retighten the two attachment
nuts. Check the blade and riving knife alignment. Make
sure riving knife clears blade by 1/8 in.
See Figure 24.
Correctly align the blade and riving knife as shown,
repeating above step as needed. Tighten attachment
nuts securely. If riving knife is not positioned correctly with
blade up, it could contact saw table when blade is lowered
and restrict blade elevation.
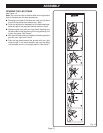
Fig. 15
LARGE HEX
WRENCH
SMALL
SPACER
SMALL
HEX WRENCH
OUTER
BLADE WASHER
LARGE
SPACER
INNER
BLADE WASHER
TO
TIGHTEN
ARBOR NUT
TO
LOOSEN
NOTE: PLACE BLADE BETWEEN
INNER AND OUTER BLADE WASHER
ARBOR
Fig. 16
ASSEMBLY
SHIMS
MOUNTING PLATE
RIVING
KNIFE
DO NOT REMOVE HEX NUTS
HEX NUTS
Fig. 14
LARGE
HEX WRENCH
SMALL HEX
WRENCH