


Page 23
OPERATION
TO CHECK, REPLACE OR ADJUST THE BLADE
GUARD ASSEMBLY
See Figures 23 - 24.
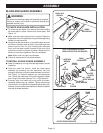
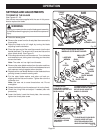
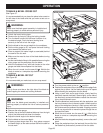
The riving knife is mounted between several shims that can
be relocated as needed to center the knife behind the blade.
It is held in place by two bolts and hex nuts at its base. The
bolts are set in slots that permit front-to-back adjustment.
WARNING:
Failure to turn the table saw off, remove the switch key,
and unplug the saw before servicing or working on it could
result in accidental starting causing possible serious
injury.
Lower the blade.
Remove the throat plate.
Raise the blade by turning the blade adjusting handle
counterclockwise or lower it by turning the handle
clockwise.
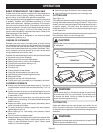
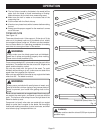
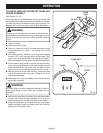
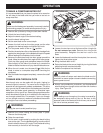
With blade guard up, make sure the riving knife is placed
at least 1/8 in. from the outer points of the blade. Then
make sure it is centered within the width of the blade. If
either placement is wrong, adjust with the following steps.
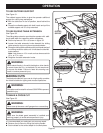
Put the saw in angle mode by moving the bevel locking
lever to the right. Slowly turn the bevel handle until the
bevel indicator is at a 30˚ angle. Lock the bevel locking
lever securely while holding the bevel handle in place.
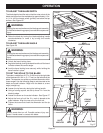
With the box end of the small hex key, remove the two
nuts at the base of the riving knife. Remove the riving
knife/guard assembly.
Rearrange the riving knife between the shims to achieve
the correct centering.
WARNING:
Properly align riving knife. Improperly aligned riving knife
can cause blade to bind which will increase risk of
kickback.
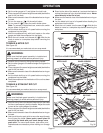
Adjust the riving knife on the bolts front-to-back as needed
to place the riving knife approximately 1/8 in. from the
blade’s outer points. Put the nuts back on and tighten.
Bring the blade back to the desired angle and height.
Lower the blade, insert the throat plate, then securely
tighten the throat plate screw.
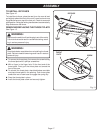
Fig. 24
RIVING KNIFE
BLADE
1/8 INCH
Fig. 23
MOUNTING
PLATE
HEX NUTS
SHIMS
RIVING
KNIFE