


13
OPERATION
WARNING: Do not allow familiarity with tools to
make you careless. Remember that a careless
fraction of a second is sufficient to inflict serious
injury.
WARNING: Always wear safety goggles or safety
glasses with side shields when operating tools.
Failure to do so could result in objects being thrown
into your eyes, resulting in possible serious injury.
APPLICATIONS
You may use this tool for the following purposes:
n Cutting all types of wood products (lumber, plywood,
paneling).
n Cross Cutting/Rip Cutting
n Bevel Cutting
n Pocket Cutting
CAUTION: To prevent damage to the battery
pack, remove the battery pack from the charger
immediately if no LED comes on. Return the battery
pack and charger to your nearest service center for
checking or replacing. Also, if you are removing the
battery pack from the charger and no LEDs are on,
return both the battery pack and the charger to your
nearest service center. Do not insert another battery
pack into the charger. A damaged charger may
damage a battery pack.
LED FUNCTIONS OF CHARGER
LED WILL BE ON TO INDICATE STATUS OF
CHARGER AND BATTERY PACK:
n Red LED on = Fast charging mode.
n Green LED on = Fully charged and in trickle charge
mode.
n Green LED on = When battery pack is inserted into
charger, indicates hot battery pack or that battery pack
is out of or below normal temperature range.
n Yellow and Green LEDs on = Deeply discharged or
defective battery pack.
n No LED on = Defective charger or battery pack.
CHARGING THE BATTERY PACK
The battery pack for this tool has been shipped in a low
charge condition to prevent possible problems. Therefore,
you should charge it until the green LED on the front of the
charger comes on.
NOTE: Batteries will not reach full charge the first time
they are charged. Allow several cycles (operation followed
by recharging) for them to become fully charged.
CHARGING A COOL BATTERY PACK
If battery pack is below normal temperature range, the
green LED on charger will come on. Allow battery pack to
reach normal temperature, then the red LED will come on.
NOTE: If the charger does not charge the battery pack
under normal circumstances, return both the battery pack
and charger to your nearest Sears Repair Center for
electrical check.
n Charge the battery pack only with the charger provided.
n Make sure the power supply is normal household
voltage, 120 volts, 60 Hz, AC only.
n Connect the charger to the power supply.
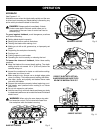
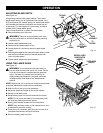
n Place the battery pack in the charger aligning raised rib
on the battery pack with the groove in the charger.
See Figure 7.
n Press down on the battery pack to be sure contacts on
the battery pack engage properly with contacts in the
charger.
n Normally the red LED on charger will come on. This
indicates the charger is in fast charging mode.
n Red LED should remain on for approximately 1 hour
then the green LED will come on. Green LED on
indicates battery pack is fully charged and charger is
in maintenance charge mode.
NOTE: The green LED will remain on until the battery
pack is removed from the charger or charger is
disconnected from the power supply.
n If both yellow and green LEDs come on, this indicates
a deeply discharged or defective battery pack. Allow
the battery pack to remain in the charger for 15 to 30
minutes. When the battery pack reaches normal
voltage range, the red LED should come on. If the red
LED does not come on after 30 minutes, this may
indicate a defective battery pack and should be
replaced.
n After normal usage, a minimum of 1 hour of charging
time is required to fully recharge battery pack.
n The battery pack will become slightly warm to the
touch while charging. This is normal and does not
indicate a problem.
n Do not place the charger and battery pack in an area
of extreme heat or cold. They will work best at normal
room temperature.
NOTE: The charger and battery pack should be placed
in a location where the temperature is more than 50°F
but less than 100°F.
n When batteries become fully charged, unplug the
charger from power supply and remove the battery
pack.