


10
ASSEMBLY
WARNING:
If any parts are missing do not operate
this tool until the missing parts are replaced. Failure
to do so could result in possible serious personal
injury.
WARNING: Do not attempt to modify this tool
or create accessories not recommended for use
with this tool. Any such alteration or modification is
misuse and could result in a hazardous condition
leading to possible serious personal injury.
WARNING: To prevent accidental starting that
could cause serious personal injury, always remove
the battery pack from the tool when assembling
parts.
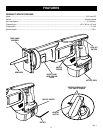
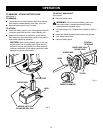
UNPACKING
This product has been shipped completely assembled.
n Carefully remove the tool and any accessories from the
box. Make sure that all items listed in the packing list
are included.
n Inspect the tool carefully to make sure no breakage or
damage occurred during shipping.
n Do not discard the packing material until you have
carefully inspected and satisfactorily operated the tool.
n If any parts are damaged or missing, please call
1-800-932-3188 for assistance.
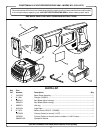
PACKING LIST
Reciprocating Saw
Blades (2)
Battery Pack
Charger
Operator’s Manual
OPERATION
WARNING: Do not allow familiarity with tools to
make you careless. Remember that a careless
fraction of a second is sufficient to inflict serious
injury.
WARNING: Always wear safety goggles or safety
glasses with side shields when operating tools.
Failure to do so could result in objects being thrown
into your eyes, resulting in possible serious injury.
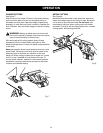
APPLICATIONS
You may use this tool for the following purposes:
n Cutting all types of wood products (lumber, plywood,
paneling, composition board, and hard wood).
n Cutting masonite and plastic.
n Cutting drywall.
n Cutting metals such as sheet steel, pipe, steel rods,
aluminum, brass, and copper.
CAUTION: To prevent damage to the battery pack,
remove the battery pack from the charger immedi-
ately if no LED comes on. Return the battery pack
and charger to your nearest service center for check-
ing or replacing. Also, if you are removing the battery
pack from the charger and no LEDs are on, return
both the battery pack and the charger to your near-
est service center. Do not insert another battery pack
into the charger. A damaged charger may
damage a battery pack.
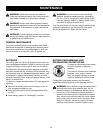
LED FUNCTIONS OF CHARGER
LED WILL BE ON TO INDICATE STATUS OF
CHARGER AND BATTERY PACK:
n Red LED on = Fast charging mode.
n Green LED on = Fully charged and in trickle charge
mode.
n Green LED on = When battery pack is inserted into
charger, indicates hot battery pack or that battery pack
is out of or below normal temperature range.
n Yellow and Green LEDs on = Deeply discharged or
defective battery pack.
n No LED on = Defective charger or battery pack.
CHARGING THE BATTERY PACK
The battery pack for this tool has been shipped in a low
charge condition to prevent possible problems. Therefore,
you should charge it until the green LED on the front of the
charger comes on.
NOTE: Batteries will not reach full charge the first time
they are charged. Allow several cycles (operation followed
by recharging) for them to become fully charged.