


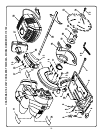
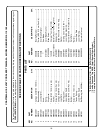

22
4
5
5
0
3
0
2
2
4
3
2
1
1
0
4
5
4
5
5
0
3
0
2
2
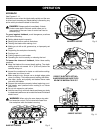
n Release the trigger and allow the blade to come to a
complete stop.
n Lift the saw from the workpiece.
n Clear corners out with a hand saw or sabre saw.
WARNING: Never tie the lower blade guard in a
raised position. Leaving the blade exposed could
lead to serious injury.
OPERATION
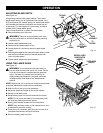
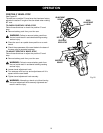
POCKET CUTTING
See Figure 26.
WARNING: Always adjust bevel setting to zero
before making a pocket cut. Attempting a pocket
cut at any other setting can result in loss of control
of the saw possibly causing serious injury.
Follow these directions to pocket cut:
n Adjust the bevel setting to zero.
n Set the blade to the correct blade depth setting.
n Swing the lower blade guard up using the lower blade
guard handle.
NOTE: Always raise the lower blade guard with the handle
to avoid serious injury.
n Hold the lower blade guard by the handle.
n Rest the front of the base flat against the workpiece
with the rear of the handle raised so the blade does not
touch the workpiece.
n Start the saw and let the blade reach full speed.
n Guide the saw into the workpiece and make the cut.
WARNING: Always cut in a forward direction
when pocket cutting. Cutting in the reverse di-
rection could cause the saw to climb up on the
workpiece and back toward you.
Fig. 26
ADJUSTMENTS
WARNING: Before performing any adjustment,
make sure the battery pack is removed from tool.
Failure to heed this warning could result in serious
personal injury.
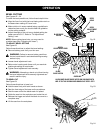
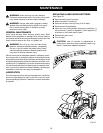
ADJUSTING THE LASER
See Figure 27.
NOTE: Draw a pencil line on a scrap workpiece parallel to
the long edge of the base as a straight line guide to aid in
the adjusting process.
�n Remove battery pack from your trim saw.
�n Make sure laser is turned off.
n Remove the laser cover by lifting it off its base.
�n Turn laser on.
�n Loosen the screw inside laser.
�n Rest the front of the base on scrap workpiece.
n Adjust the laser beam with the mark on the scrap
workpiece by loosening the screw to the laser aperture
and slowly moving laser guide left or right.
n Since blade thicknesses vary, always make a trial cut in
scrap workpiece to ensure an accurate cut.
�n Once alignment is achieved tighten the screw.
�n Replace the laser cover.
n Check for proper alignment.
�n Repeat as necessary until laser is aligned.
LASER
COVER
SCREW
Fig. 27
POCKET CUT
LOWER BLADE GUARD
LONG EDGE
OF BASE
PENCIL LINE