


8
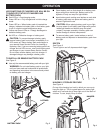
BATTERY PACK
Fig. 2
LED FUNCTIONS OF CHARGER LED WILL BE ON
TO INDICATE STATUS OF CHARGER AND
BATTERY PACK:
■ Red LED on = Fast charging mode.
■ Green LED on = Fully charged and in trickle charge
mode.
■ Green LED on = When battery pack is inserted into
charger, indicates hot battery pack or that battery pack
is out of or below normal temperature range.
■ Yellow and Green LEDs on = Deeply discharged or
defective battery pack.
■ No LED on = Defective charger or battery pack.
CAUTION: To prevent damage to battery pack,
remove battery pack from charger immediately if no
LED comes on. Return battery pack and charger to
your nearest Sears Service Center for checking or
replacing. Also, if you are removing battery pack from
charger and no LEDs are on, return both battery pack
and charger to your nearest Sears Service Center.
Do not insert another battery pack into charger. A
damaged charger may damage a battery pack.
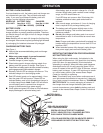
TO INSTALL OR REMOVE BATTERY PACK
See Figure 2.
■ Use only the recommended battery pack with your light.
WARNING: Do not install battery pack to your light
until you have read and understood all precautions
and operating instructions in the manual and printed
on battery pack and charger.
■ Orient battery pack so that raised rib on battery pack
aligns with groove inside light. Battery pack is de-
signed to fit only one way into light handle.
■ Insert battery pack, making sure latches on each side
of battery pack snap into place and battery pack is
secure in light before use.
CAUTION: When placing battery pack in your light,
be sure raised rib on battery pack aligns with groove
inside light handle and latches snap into place
properly. Improper assembly of battery pack can
cause damage to internal components.
■ To remove battery pack, locate latches on end of
battery pack and depress to release battery pack from
your light.
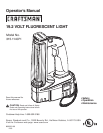
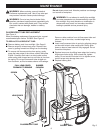
SWITCH
See Figure 3.
To turn light on and off, depress switch trigger.
HANGING / STORAGE FEATURE
See Figure 4.
On top of the housing is a hook in which you can use to
hang the light up. This is a good feature for storing light
when not in use and also to keep light out of the reach of
children. To use, simply lift up on hook.
Fig. 3
OPERATION
LATCHES
Fig 4
SWITCH
HANGER
TO
LOWER
TO
RAISE