


-16-
M1014 7" x 12" Metal Cutting Bandsaw
SET UP
Shipping Strap and
ON/OFF Switch
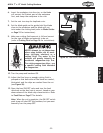
To ensure that your bandsaw arrives to you without
damage to the hinge system, a shipping strap was
installed. After shipping strap removal, adjust the
headstock-stop bolt so the bandsaw ON/OFF switch is
not damaged by the headstock.
Note: Keep this shipping strap in the event that you
must transport the bandsaw.
To remove the shipping strap, do these steps:
1. Turn the feed lever OFF (Figure 22) so the
headstock is supported when the shipping strap is
removed.
2. Remove the ON/OFF switch push strap and save it
for reinstallation later (see Figure 21).
3. Using a screwdriver and a 14mm wrench, remove
the screw, headstock stop bolt, and shipping strap.
4. Reinstall the headstock stop bolt to the lowest
setting, and engage the feed lever so the headstock
settles naturally to the lowest position.
5. Rotate the stop bolt counterclockwise so the
headstock is slightly supported by the stop bolt, and
tighten the jam nut.
6. With the bandsaw unplugged, flip the ON/OFF
switch to the ON position.
7. Reinstall the ON/OFF switch push strap so it has
just pushed the toggle switch downward to the OFF
position, but does not force the toggle past the OFF
position and tear the rubber boot or damage the
switch.
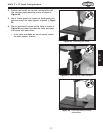
Vertical Cutting Table
If you install the vertical cutting table, this bandsaw can
be set up and used as a vertical-cutting bandsaw.
To install the vertical cutting table, do these steps:
1. MAKE SURE THE POWER CORD IS UNPLUGGED!
2. Raise the bandsaw headstock to the vertical
position, and with the feed lever, lock the headstock
in place (see Figure 22).
3. Remove the screws and stop plate as shown in
Figure 23.
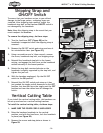
Figure 21. Shipping strap location.
Figure 23. Removing the stop plate.
Figure 22. Feed lever in the locked
position.
Stop Bolt
Shipping
Strap
ON/OFF
Switch
Push Strap