


-35-
M1014 7" x 12" Metal Cutting Bandsaw
SERVICE
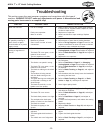
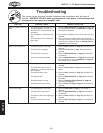
SYMPTOM POSSIBLE CAUSE CORRECTIVE ACTION
Motor will not start. 1. Low or no voltage.
2. Faulty start capacitor.
3. Motor is at fault.
1. Open or short circuit in line cord or plug resulting
in blown fuse or tripped breaker. Repair for cause
of short or open circuit.
2. Replace start capacitor.
3. Motor has shorted or open windings. Replace
motor.
Motor automatically shuts
off (possibly resulting in
blown fuse or tripped
circuit breaker or in power
supply circuit).
1. Faulty start capacitor.
2. Bandsaw is jammed.
3. Short circuit in motor or loose
connections.
1. Replace start capacitor.
2. Remove part or metal that is binding bandsaw.
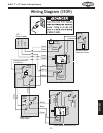
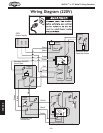
3. Refer to Wiring Diagrams on Pages 33 and 34, and
inspect connections on motor for loose or shorted
terminals or worn insulation and repair.
Machine is loud when
cutting or bogs down in
the cut.
1. Excessive feed rate.
2. The blade TPI is too great, or the
material is too coarse.
3. The run capacitor is at fault.
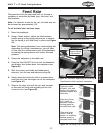
1. Refer to Feed Rate on Page 27, or Changing
Cutting Speed on Page 19, and adjust as required.
2. Refer to Blade Selection on Page 24 and adjust as
required.
3. Replace the run capacitor.
Blades break often. 1. The workpiece is loose in the vise.
2. The feed or cut speed is wrong.
3. The blade TPI is too great, or the
material is too coarse.
4. The blade is rubbing on the wheel
flange.
5. The bandsaw is being started
with the blade resting on the
workpiece.
6. The guide bearings are misaligned,
or the blade is rubbing on the
wheel flange.
7. The blade is too thick, or the
blades are of low quality.
1. Clamp the workpiece tighter, or use a jig to hold
the workpiece.
2. Refer to Feed Rate on Page 27, or Changing
Cutting Speed on Page 19, and adjust as required.
3. Refer to Blade Selection on Page 24, and adjust
as required.
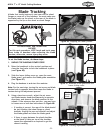
4. Refer to Blade Tracking on Page 31, and adjust as
required.
5. Start bandsaw and then slowly lower the headstock
by setting the feed rate.
6. Refer to Blade Tracking on Page 31, or Blade
Guides on Page 21, and adjust as required.
7. Use a higher quality blade.
Blade dulls prematurely. 1. The cut speed is too fast.
2. The blade TPI is too coarse.
3. The blade feed pressure is to light.
4. The workpiece has hard spots,
welds, or scale is on the material.
5. The blade is twisted.
6. The blade is sipping on the
wheels.
1. Refer to Changing Cutting Speed on Page 19,
and adjust as required.
2. Refer to Blade Selection on Page 24, and adjust
as required.
3. Refer to Feed Rate on Page 27, and adjust as
required.
4. Increase the feed pressure, and reduce the cutting
speed.
5. Replace the blade.
6. Refer to Blade Tension on Page 20, and adjust as
required.
Blade wears on one side. 1. The blade guides are worn or mis-
adjusted.
2. The blade guide slide bracket is
loose.
3. The wheels are out of alignment.
1. Refer to Blade Guides on Page 21 and replace or
adjust.
2. Tighten the blade guide bracket.
3. Refer to Blade Tracking on Page 31, and adjust as
required.
Troubleshooting
This section covers the most common symptoms and corrections with this type of
machine. WARNING! DO NOT make any adjustments until power is disconnected and
moving parts have come to a complete stop!