


-20-
W1677/W1711 10" Table Saw
SETUP
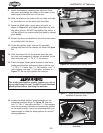
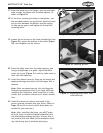
Figure 26. Installing the splitter shaft.
Figure 27. Blade guard bracket assembly
installed on splitter shaft.
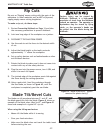
16. Attach the blade splitter/guard assembly at the
mounting locations shown in
Figure 28. Use the
two
5
⁄16"-18 x 1" hex bolts and two
5
⁄16" flat washers
from the inventory hardware to connect the splitter
to the shaft bracket. Leave the mounting bolts just
loose enough to slide the blade splitter on and off
during alignment.
Figure 28. Blade splitter/guard assembly
attached.
Set Screws
Mounting Locations
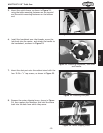
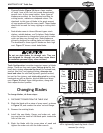
Figure 25. Installing blade.
9. Install the blade by removing the arbor nut from
the arbor and placing the blade on the arbor so the
teeth face toward the front of the saw.
10. Hold the blade on the arbor with one hand and tight-
en the arbor nut on the arbor with the other.
11. Brace the blade with a scrap piece of wood, as
shown in
Figure 25, and tighten the arbor nut with
the arbor wrench. DO NOT overtighten the nut or it
will be difficult to remove when you need to change
your blades.
12. Attach the fence as detailed in the instruction manu-
al included with the fence.
13. Screw the splitter shaft into the tilt assembly
through the back of the cabinet, as shown in
Figure
26.
14. Slide the lower half of the bracket onto the split-
ter shaft and temporarily tighten the bracket to the
shaft with the two
5
⁄16"-18 x
3
⁄8" set screws.
15. Place the upper blade guard bracket on the lower
blade guard bracket and secure them with the two
5
⁄16"-18 x 1
1
⁄2" bolts, four
5
⁄16" flat washers, two
5
⁄16"
lock washers, and two
5
⁄16" hex nuts, as shown in
Figure 27. Do not fully tighten the nuts yet.
The blade guard/splitter greatly reduces the risk of
injury when using this saw. You MUST install the blade
guard/splitter before operating the machine.