


-14-
W1737/W1738 Owner's Manual (Mfg. 10/09+)
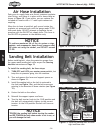
Pushyourairsupplyhoseontotheairpressureregulator
inlet fitting, and clamp it in place with a hose clamp as
shown in . If you prefer, you can replace the
includedairnozzlewitha
3
⁄8" male quick connect air
coupling.
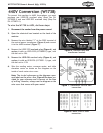
When the air hose is installed, pull up and rotate the
regulatorairpressureknobuntilthegaugereads70PSI
thenpushdown.DONOTattempttoregulatetheair
pressurewiththeON/OFFairsupplylever.Thisleveris
theON/OFFairpressuretothemachineonly.
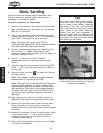
Before installing belt, clean the protective grease from
the upper metal sanding belt roller as per the
instructions on .
but
keep the air pressure going into the machine.
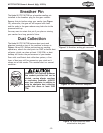
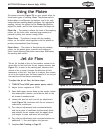
Turn and remove the lever and support spacer as
shown in
Install the sanding belt so the belt is centered in
the fork (see ),and the belt arrows are
pointing in the direction of drum rotation (see
).
Center the belt on the rollers.
Reinstall the support spacer and lever.
Turn the belt tension knob to the 12:00 position and
the belt will automatically tighten to the correct
tension.Atthe9:00positionthebeltwillhaveno
tension.
Airhoseattachedtoregulator.
Leverremoval/installation.
Installing sanding belt left and
right machine view.
Belt
Tension
Knob
Correct Belt Direction
Make Sure
the Belt is
Centered
In the Fork