


-28-
W1756/W1757 43" Wide-Belt Sander
OPERATIONS
Note: The lower left corner Run LED will illuminate
and the display numbers will glow steadily when
measurements have been accepted and the table is
auto-adjusting. When the correct sanding depth is
achieved, the lower left corner Run LED will turn
off and the final resulting workpiece thickness is
displayed.
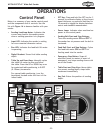
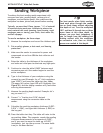
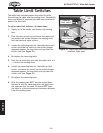
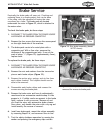
11. Start the feed belt, stand to the side as shown in
Figure 21, and feed the workpiece into the sander.
12. Observe the amp draw meter, and press the table
down arrow key on the key pad to reduce the
sanding depth if the amp load meter indicates motor
overload, or reduce the feed rate.
13. Remove the workpiece from the outfeed side, which
is now sanded down
1
⁄64". Re-sand the workpiece
a couple of times more at this depth to ensure a
consistent sanding depth.
14. Add a new sanding depth the same way as in Steps 9
and 10, and sand again.
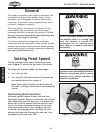
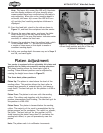
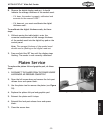
Platen Adjustment
Your sander is equipped with an adjustable felt platen and
graphite slip for those extra sensitive sanding operations.
The platen position allows for three basic types of
sanding. These different positions can be adjusted by
rotating the height lever shown in
Figure 22.
The three basic platen positions:
Platen Up
: The platen is raised above the level of the
sanding rollers. This position allows the front roller to
remove large amounts of material quickly, but leaves a
rough finish. The best belt grit for this position is #100 or
coarser.
Platen Even
: The platen is set even with the sanding
rollers. The rollers work together with the platen to
produce intermediate/final finishing. The best belt grit for
this position is #100-#150.
Platen Down
: The platen is lowered below the sanding
rollers. The majority of the work is accomplished by the
platen pressure on the workpiece. The result is a smooth,
flat finish. The best belt grit for this position is #150.
Avoid lowering the platen more than 0.2 mm below the
sanding belt rollers, or you will prematurely wear the
platen.
Note:
The platen scale is in millimeter increments.
Figure 22. Platen controls.
Lock
Lever
Height
Lever
Scale and
Pointer
Figure 21. Operator feeding workpiece at
correct body position and out of the way
of potential kickback.