


-56-
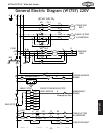
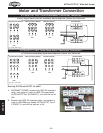
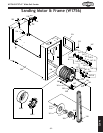
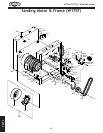
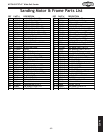
W1756/W1757 43" Wide-Belt Sander
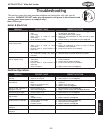
SERVICE
PROBLEM POSSIBLE CAUSE CORRECTIVE ACTION
Lines across width of
workpiece.
1. Sanding belt seam is open or damaged.
1. Repair or replace sanding belt (
see Page 45).
Glossy spots or streaks on
workpiece.
1. Worn sanding belt.
2. Rear pressure roller too low.
1. Replace sanding belt
(see Page 45).
2. Raise rear pressure roller. (See warning in Pressure Roller
section, Page 20!)
Sanding belt clogs quickly. 1. Sanding belt grit too small for particu
-
lar job.
2. Excessive depth of cut.
3. Wood is too moist.
1. Replace with a coarser grit sanding belt.
2. Reduce depth of cut
(see Page 28).
3. Allow wood to dry out.
Sanding belt does not tension
correctly; rollers slip under
belt.
1. Low air pressure.
2. Air leaks in system.
1. Adjust air pressure to 75 PSI at primary regulator
(see Page
31).
2. Inspect all hoses and connections for leaking air; use water
on suspected area to detect bubbles.
Sanding belt runs off to one
side, stopping the sander.
1. Air eye fork clogged.
2. Oscillation return valve closed.
3. Oscillation timing incorrect.
1. Clean the intake hole on the air eye fork.
2. Open valve.
3. Adjust oscillation timing (see
Page 36).
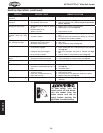
Sanding belt will not start. 1. Sanding belt is not tensioned.
2. Limit switches engaged.
3. Emergency stop plate engaged.
4. No air pressure to sander.
1. Tension sanding belt (see
Page 19).
2. Center sanding belt so it is not touching the limit switches
(see Page 46).
3. Make sure emergency stop plate is released (see
Page
26).
4. Connect sander to compressed air system (
Page 18)
Poor, non-aggressive sanding
results.
1. Worn sanding belt.
2. Sanding belt loaded with sawdust.
1. Replace sanding belt with a new one
(see Page 45).
2. Clean sanding belt to unload sawdust (
see Page 30).
Feed belt not tracking in cen
-
ter.
1. Feed belt moved out of adjustment.
1. Adjust feed adjustment bolts (see
Page 46).
Feed belt slipping. 1. Feed rollers have incorrect tension.
2. Feed rollers contaminated with dirt or
dust.
1. Adjust feed rollers to place more tension on the workpiece
(see Page 45).
2. Clean feed rollers.
Emergency brake stops slow. 1. Air pressure incorrect.
2. Air leak in system.
3. Brake rotor contaminated with oil.
4. Brake pads worn out.
1. Adjust air pressure to 75 PSI (see
Page 31).
2. Find and fix air leaks.
3. Clean brake rotor with automotive brake parts cleaner.
4. Replace brake pads (see Page 35).
Grinding noise when braking. 1. Brakes severely worn out.
1. Replace brake pads (
Page 35), have rotor turned (possibly
replaced).
Machine Operations (continued)
For your safety, turn the
power switch off and discon
-
nect the sander from the
power source and the air
supply before starting the
applicable troubleshooting.
OFF