


-35-
W1756/W1757 43" Wide-Belt Sander
SERVICE
Brake Service
Eventually the brake pads will wear out. Checking and
replacing these is a simple project that can be done
in the shop, with the exception of having the rotor
resurfaced on a lathe.
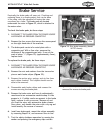
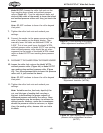
The brake pads are located
underneath the rotor in Figure
32, which is attached to
the motor arbor.
To check the brake pads, do these steps:
1. DISCONNECT THE SANDER FROM THE POWER SOURCE
AND REMOVE AIR PRESSURE COMPLETELY
!
2. Remove the four screws that secure the access panel
on the right-hand side of the machine.
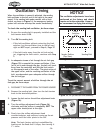
3. The brake pads consist of a metal plate with a
composite pad. With a fine ruler, measure the
thickness of the composite pad only. If one of the
pads is below
1
⁄8" (Figure 33) (approximately 3mm),
replace both.
To replace the brake pads, do these steps:
1. DISCONNECT THE SANDER FROM THE POWER SOURCE
AND REMOVE AIR PRESSURE COMPLETELY
!
2. Remove the nuts and washers from the two anchor
pins on each brake caliper (
Figure 32).
3. Remove the anchor pins, springs, and air line from
each caliper bracket. The calipers should now be
able to be removed.
4. Disassemble each brake caliper and remove the
screws securing the brake pads.
5. Remove the brake rotor and have it professionally
resurfaced at an automotive machine shop if it has
gouges in it. If visible cracks are present in the brake
rotor, replace it with a new one. Remove oil and
dirt from the rotor with automotive brake cleaner.
Once clean, only handle the rotor with a dry rag and
install exactly the reverse of removal.
6. Install new brake pads, mount the caliper assembly
by reversing
Steps 2-4, and reconnect the air line.
7. Test the safety shutdown operation by running the
sander and pressing the emergency stop controls.
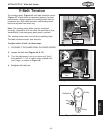
Figure 33. Example of brake caliper
removed for access to brake pads.
Brake
Pads
1
⁄8"
Min
Figure 32. Disc brake assembly (Model
W1757 shown).
Retaining
Nut
Anchor
Pins
Rotor
Caliper Assemblies