


-37-
W1756/W1757 43" Wide-Belt Sander
SERVICE
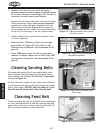
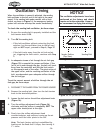
6. Tighten the lock nut (Figure 36) to secure the
airflow adjustment knob.
7. Restrict the airflow across the air fork gap with a
scrap piece of wood. You should notice the roller
pivot to the right. When the wood scrap is removed,
the roller should pivot back to the left.
8. Reinstall the sanding belt.
9. Test the oscillation by running the sander. Make note
of the time it takes for the belt to osc
illate from
left-to-right and from right-to-left.
When correctly timed, the oscillation should take a
similar amount of time to oscillate from side-to-side.
— If the oscillation time to the right is 2 seconds,
but the oscillation time to the
left is longer,
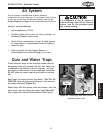
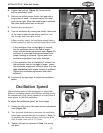
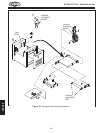
loosen the oscillation adjustment knob (
Figure 37)
and move it to the
left (counterclockwise) until
proper tracking is achieved. Tighten down the
oscillation adjustment knob when satisfied.
— If the oscillation time to the left is 2 seconds, but
the oscillation time to the
right is longer, loosen
the oscillation adjustment knob and move it to the
right (clockwise) until proper tracking is achieved.
Tighten the oscillation adjustment knob when
satisfied.
10. Continue to the next page to adjust the oscillation
speed.
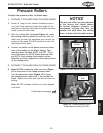
Figure 37. Oscillation adjustment knobs.
Adjustment Knobs
Oscillation Speed
The oscillation speed of the sanding belt is adjustable.
Different oscillating speeds yield different sanding results.
We recommend trying various speeds on a scrap piece of
wood similar to the final workpiece.
To adjust the oscillation speed, do these steps:
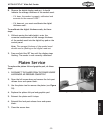
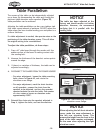
1. Loosen the lock nut on the speed control adjustment
knob (
Figure 38).
2. Turn the knob clockwise to decrease the oscillation
speed and counterclockwise to increase it.
Note: To
re-establish the factory setting, back out the knob
until it stops, then turn it 3
1
/2 turns.
3. Tighten the lock nut loosened in Step 1 to secure
the knob.
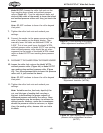
Figure 38. Speed control adjustment
knob.
Speed Control
Knob
Lock Nut