


-8-
Model W1761/W1762 (M-1/10, S7/10+)
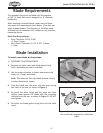
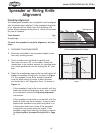
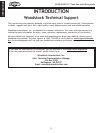
Figure 14. Spreader/riving knife alignment
zone.
8c`^ed\ek
Qfe\
Jgi\X[\ifi
I`m`e^Be`]\
9cX[\
JkiX`^_k\[^\
Spreader or Riving Knife
Alignment
Checking Alignment
The blade guard spreader and riving knife must be aligned
with the blade when installed. If the spreader/riving knife
is not aligned with the blade, then the workpiece will
before forced sideways during the cut, which will increase
the risk of kickback.
Tools Needed Qty
Straightedge .....................................................1
To check the spreader/riving knife alignment, do these
steps:
1. DISCONNECT SAW FROM POWER!
2. Raise the saw blade to the maximum height so you
have easy working access.
3. Check to make sure the blade is parallel with
the miter slot and is 90° to the table. Follow the
instructions in the original manual for checking miter
slot —blade parallelism, and for setting the 90° stop
bolt.
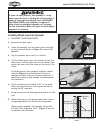
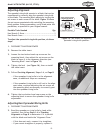
4. Place the straightedge against the top and bottom of
blade and spreader/riving knife, as shown in Figure
13. The spreader/riving knife should be parallel
with the blade along its length at both positions
and should be in the "Alignment Zone," as shown in
Figure 14.
— If the spreader/riving knife is not parallel with the
blade and inside the alignment zone, then it needs
to be adjusted. Proceed to Adjusting Alignment
instructions.
— If the spreader/riving knife is not parallel with the
blade at either the top or bottom, it may be bent.
Remove the spreader/riving knife and place it on
a flat surface and check to see if the spreader/
riving knife lays evenly along its length. If the
spreader/riving knife does not lay evenly, proceed
to Adjusting Bent Spreader/Riving Knife on Page
9.
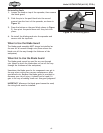
Figure 13. Checking top and bottom riving
knife parallelism with blade.
Table
Riving
Knife
Top Alignment
Bottom Alignment