


-15-
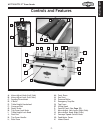
W1772/W1773 37" Drum Sander
SET UP
Assembly
To attach the top cover, control panel, and handwheel
to the drum sander, do these steps
:
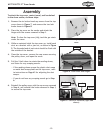
1. Remove the six button head cap screws from the top
cover shown in
Figure 7, and remove the two lock
knobs shown in Figure
8.
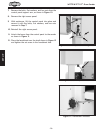
2.
Place the top cover on the sander and attach the
hinges with the screws removed in Step 1
.
Note: To close the top cover fully, tuck the gas struts
under the cover.
3. While an assistant holds the top cover up, install each
strut on
a bracket with a jam nut, as shown in Figure
9. The threaded end of each strut should be flush with
the outside of the bracket
.
4. Close the top cover, remove the cap screws securing
the pulley cover, and open the cover.
5. Pull the V-belt down to rotate the sanding drums,
and listen for any scraping sounds.
— If the sanding drums scrape the plastic dust scoop
or metal dust scoop plates on the top cover, refer
to instructions on
Page 43 for adjusting the dust
scoops.
— If you do not hear any scraping sounds go to
Step
6.
6. Reinstall the pulley cover with the cap screws removed
in Step 4
, and reinstall the knobs removed in Step 1,
to secure the top cover
.
Figure 7. Removing cap screws on top
cover.
Figure 8. Lock knobs and hinges.
Hinges
Figure 9. Gas strut installed (right side
shown).
Bracket
Jam Nut
Gas Strut
Lock Knobs