


-36-
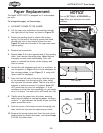
W1772/W1773 37" Drum Sander
SERVICE
Conveyor Tensioning &
Tracking
Tensioning
The conveyor may slightly stretch with continued use and
will eventually need to be tensioned. This is most obvious
if the conveyor starts slipping on the rollers.
When you tension the conveyor, focus on turning the
adjustment bolts in even increments. Tensioning one side
more than the other will cause tracking problems, which
will require you to take additional steps to get the sander
operating correctly.
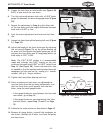
To tension the conveyor, do these steps:
1. Using a 19mm wrench, loosen the lock nut (see
Figure 47) on both sides of the conveyor.
2. Measure the distance from the frame to the convey-
or roller on both sides. Turn the adjustment bolts so
the distance between the frame and conveyor roller
is identical on both sides. Do not overtighten the
conveyor. Your goal is to reach a
3
/4" gap between
the underside of the conveyor and the belt, as
shown in
Figure 48.
3. Use a magic marker, white out, or fingernail polish to
mark the front of the conveyor tensioning bolt on both
sides.
This step will aid you in keeping track of the rotations
as you turn the bolts, so the bolts remain as even as
possible.
4. Turn both of the conveyor adjustment bolts clock-
wise one full turn at a time until the conveyor belt
no longer slips during operation.
— If the conveyor starts tracking to one side, imme
-
diately turn the drum sander
OFF and perform the
tracking instructions.
5. Tighten the lock nuts to lock the conveyor adjust-
ment bolts in place.
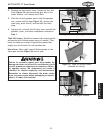
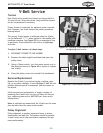
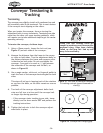
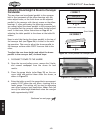
Figure 47. One side of conveyor tensioning
& tracking controls (guard removed for
clarity).
Adjustment
Bolt
Lock Nut
Frame-Conveyor
Roller Distance
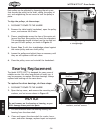
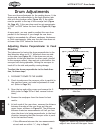
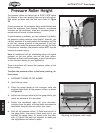
Figure 48. Conveyor belt hanging gap.
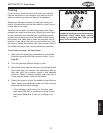
Loose hair and clothing could get
caught in machinery and cause serious
personal injury. Keep loose clothing
rolled up and long hair tied up and
away from machinery.