


-41-
W1772/W1773 37" Drum Sander
SERVICE
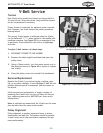
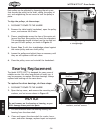
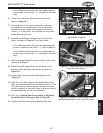
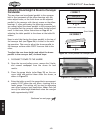
5. Loosen the lock lever or lock handle (see Figures 56
& 57) at one end of the rear drum.
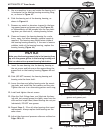
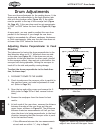
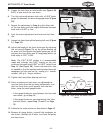
6. Turn the micro-adjustment knob until a 0.010" feeler
gauge fits between the drum and gauge board (
Figure
58).
7. Repeat the adjustment in Step 6 on the other side
of the rear drum until the height difference between
both ends is 0.002" or less.
8. Lock the micro-adjustment lock lever and lock han-
dle.
9. Loosen the front drum pillow bearing lock nuts (Figure
51, Page 39).
10. Adjust the height of the front drum ends by adjusting
the set screws (
Figure 51) on the pillow bearing up
or down until the largest size feeler gauge you can fit
between the front drum and 36" long gauge blocks (at
both ends) is 0.017"
–0.025.
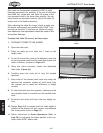
Note: The 0.017"–0.025" setting is a recommended
range and includes the 0.010" setting on the rear
drum and the additional 0.007" to 0.015" height from
Step 12
(See Figure 58). Some trial-and-error may
be needed to find the optimal setting based upon the
sandpaper grit size you use (ie, coarse grit = smaller
number; fine grit
= larger number).
11. Tighten the front pillow bearing lock nuts.
12. Check to make sure that when you tightened the
nuts the front drum did not move horizontally, and
that the front drum is still parallel with the rear
drum, using the small gauge blocks.
— If the gauge blocks are snug between the front and
rear drums, go to Step 14
.
— If the gauge blocks are not snug betwen the front
and rear drums, repeat Step 11 and 12 on
Page
39.
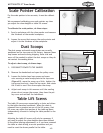
13. Calibrate the scale pointer as described on Page 43.
14. Remove all gauge blocks, reinstall the sandpaper on
the dr
ums, reinstall the V-belts, and close the pulley
and top covers.
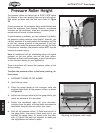
Figure 57. Rear left sanding drum micro-
adjusting knob.
Micro-Adjust
Knob
Lock
Handle
Figure 56. Rear right sanding drum micro-
adjusting knob.
Micro-Adjust
Knob
Lock Lever
Figure 58. Rear drum set below front
drum.
(Step 7)
(Step 12)