


-22-
W1816 Owner's Manual (Mfg. Since 10/09)
SETUP
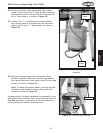
Once the assembly is complete and before you connect to
any duct lines, test run your machine to make sure it runs
properly.
If, during the test run, you cannot easily locate the source
of an unusual noise or vibration, stop using the machine
immediately, then review the Troubleshooting guide on
Page 39.
If you still cannot remedy a problem, contact our Tech
Support at (360) 734-3482 for assistance.
Note: Without any inlet flow constriction, the motor
will work the hardest and draw maximum amps. If this
condition should trip the circuit breaker, connect the inlet
port to your duct system or a duct hose with a blast gate
closed half-way.
To test run the machine, do these steps:
1. Make sure you have read the safety instructions at
the beginning of the manual and that the machine is
setup properly.
2. Make sure all tools and objects used during setup are
cleared away from the machine.
3. Review the Electrical requirements on Page 9 and
connect the machine to the power source.
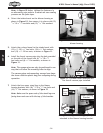
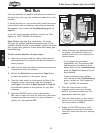
4. Press the start switch to allow power to flow to the
magnetic switch—the power light will illuminate
(see Figure 31). Refer to Basic Controls on Page 24
for additional details on the controls for your dust
collector.
5. Press the ON/OFF button to turn the machine
ON—the run light will come on. Make sure your hand
is poised over the start switch in case you need to
quickly turn the machine OFF.
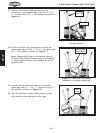
Test Run
6. Listen and watch for abnormal noises
or actions. The machine should run
smoothly with little or no vibration or
rubbing noises.
— If you suspect any problems,
immediately turn the machine OFF
and disconnect the machine from
power. Refer to the Troubleshooting
guide on Page 39 to identify and fix
any problems.
— If you cannot solve the problem
with the use of the Troubleshooting
guide, contact our Tech Support at
(360) 734-3482 for assistance.
7. Press the timer button on the
magnetic switch and cycle through
each of the times to make sure the
appropriate indicators light.
8. Press the timer button on the remote
control and cycle through the times in
the same manner as Step 7.
9. Toggle the ON/OFF button on both
the magnetic switch and the remote
control to make sure they are working
properly.
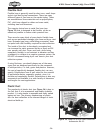
Figure 31. Machine controls.
Remote
Control
Start
Switch
ON/OFF
Button