


FIG. 51
58
.
Dado cuts should be made in the 90° position only. When using the
d
ado set it will be necessary to remove the Blade Guard and
Spreader. USE CAUTION.
1. When dado cutting across the width of the board, use miter
gauge to push the board.
2. When dado cutting the length of the board:
For edge of the board use set-up in Fig. 47.
For width of the board use set-up in Fig. 49.
ALWAYS REPLACE THE BLADE GUARD AND SPREADER
WHEN YOU ARE FINISHED DADO CUTTING.
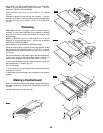
Special Cutting Techniques
This table saw is a highly versatile tool, capable of
performing a wide range of highly specialized cuts
that cannot be covered in this manual. Do not attempt to perform
cuts not covered in this manual unless you are thoroughly familiar
with procedures and fixturing.
See your local library for books on woodworking techniques, such
as: The Complete Book of Stationary Power Tool Techniques by
R.J. De Christoforo.
WARNING
!
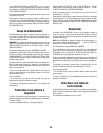
Maintaining Your
Table Saw
Maintenance
For your own safety, turn switch “OFF” and
remove plug from power source outlet before
maintaining or lubricating your saw.
Do not allow sawdust to accumulate inside the saw. Frequently
blow out any dust that may accumulate inside the saw cabinet and
the motor. Clean your cutting tools with a Gum and Pitch Remover.
The cord and the tool should be wiped with a dry clean cloth to
prevent deterioration from oil and grease.
Certain cleaning agents and solvents can damage
plastic parts. Some of these are: gasoline, carbon
tetrachloride, chlorinated cleaning solvents, ammonia and
household detergents which contain ammonia. Avoiding use of
these and other types of cleaning agents will minimize the
possibility of damage.
A coat of automobile-type wax applied to the table will help to keep
the surface clean and allow workpieces to slide more freely.
If the power cord is worn or cut, or damaged in any way, have it
replaced immediately.
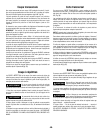
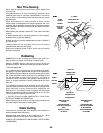
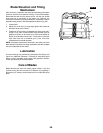
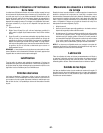
Make sure the teeth of the ANTIKICKBACK pawls are always
sharp. To sharpen:
1. Remove blade guard.
2. Rotate pawl toward rear of spreader so that teeth are above top
of spreader.
3. Hold spreader with left hand and place pawl over corner of
workbench (Fig. 51).
4. Using a small round file (Smooth Cut) sharpen the teeth.
All repairs, electrical or mechanical, should be
attempted only by trained repairmen. Contact the
nearest Factory Service Center or Authorized Service Station or
other competent repair service. Use only identical replacement
parts, any other may create a hazard.
WARNING
!
WARNING
!
WARNING
!