


??19.8E-:006A?@91:@?
;A:@5:3@;);>7.1:/4
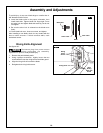
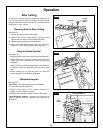
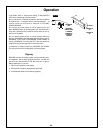
See figure 8.
If saw is to be used in a permanent location, it should be
fastened securely to a firm supporting surface such as a
stand or workbench, using the four mounting holes.
When mounting saw to a workbench or plywood, holes
should be drilled through the supporting surface of the
workbench or plywood and a opening MUST be made the
same size as the opening in the bottom of the saw, so the
saw dust can drop through.
Each of the four mounting holes should be bolted securely
using 5/16" hex nuts (not included). Screw lengths should
be 2" longer than the thickness of the bench top.
1.Locate and mark where the saw is to be mounted.
2.Drill four (4) 3/8" diameter holes through workbench.
3.Place saw on workbench aligning holes in base with
holes drilled in workbench.
4.Insert four (4) 5/16" screws and tighten.
;A:@5:3@;"8EC;;0
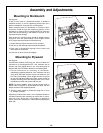
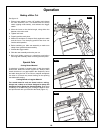
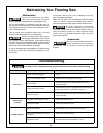
See figure 9.
An alternative method of securing your saw is to fasten the
saw base to a mounting board 24" x 24" minimum size to
prevent saw from tipping while in use. Any good grade of
plywood with a 3/4" minimum thickness is recommended.
1. Follow instructions for mounting to workbench,
substituting a plywood board 24" x 33" minimum size and
using 5/16" flat head machine screws, flat washers, and
hex nuts (not included). Screw length must be so screws
do not protrude above table top surface. Insert screws up
through mounting board and through base holes. Place
flat washers on stud and secure with hex nuts.
!& For proper stability, holes must be counter sunk on
bottom side of plywood so screw heads are flush with the
bottom surface of the supporting board.
2. Securely clamp board to workbench using two or more
“C” clamps, as shown.
Supporting surface where saw is to be mounted should be
examined carefully after mounting to insure that no move -
ment can occur during use. If any tipping or walking is
noted, secure the workbench or stand before operating the
table saw.
FIG. 8
FIG. 9