


!<1>-@5;:
5@1>A@@5:3
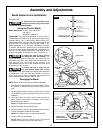
A miter cut is made at any miter angle in the range from 0-
47°. The miter scale is cast-in on the base for easy reading.
P
ositive detents have been provided for fast and accurate
mitering at 0°, 22.5°, and 45°.
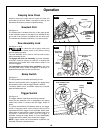
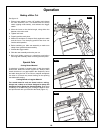
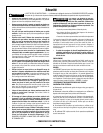
">1<->5:3%-C2;>5@1>A@@5:3
S
ee figure 12.
1. Loosen and remove fence locking knob.
2. Place fence in miter cutting position, by placing the
fence’s miter pin into the hole located on the table.
3. Replace fence locking knob in threaded hole.
4. Make sure anti-kickback pawls and front hold down
bracket are in their fully up position for miter cutting.
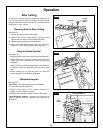
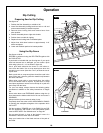
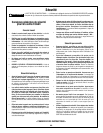
;0E-:0-:0";?5@5;:
See figure 13.
• Hold work piece firmly to the fence to prevent movement.
• Keep hands away from blade and its cutting path until
trigger has been released and blade has stopped
completely.
• Keep feet firmly on the floor and maintain proper balance.
• If following a pencil line, align work piece to kerf of insert
plate.
• Before making any cut, with the power off, slide saw
toward work piece to preview the blade path.
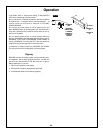
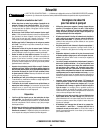
);>7<51/1%A<<;>@
See figure 14.
(5/18-9<- This clamp easily secures a workpiece.
1.Insert clamp post into clamp hole.
2.Rotate screw knob of the clamp clockwise to
tighten, counter-clockwise to loosen.
3.Slide the saw assembly to check clearance with clamp.
;:3);>7<51/1%A<<;>@ - Support long workpieces to
prevent sagging. Use cut 2x4 block to support long
workpieces.
FIG. 13
FIG. 14
(5/1
8-9<
8-9<%/>1C:;.
8-9<
;81
FIG. 12
1:/1
;/75:3
:;.
5@1>"5: