


42
Mounting Applications
Workbench
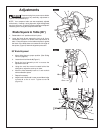
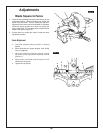
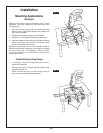
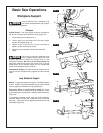
M
ount the saw using the three (3) bolt holes (7/16
") 1 t
o the
workbench. Check for clearance to the left and right of the
saw (Figure 13).
1. Each of the three (3) mounting holes should be bolted
securely using 7/16” flat head screws, lock washers, and
h
ex nuts (not included).
2. Locate and mark where the saw is to be mounted.
3. Drill three (3) 7/16” diameter holes through workbench.
4. Place the compound miter saw on the workbench aligning
holes in base with holes drilled in workbench. Install
screws, lock washers and hex nuts.
Supporting surface where saw is to be mounted should be
examined carefully after mounting to insure that no movement
can occur during use. If any tipping or walking is noted,
secure the workbench or stand before operating the
compound miter saw.
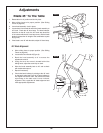
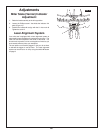
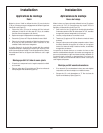
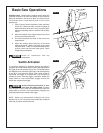
Portable Mounting Using Clamps
• If necessary, clamp the compound miter saw to a
workbench or table top.
• Place two (2) or more “C” clamps
2 on the clamping areas
and secure (Figure 14).
NOTE: Always make sure you leave enough room in
work area to accommodate long workpieces.
Installation
FIG. 13
FIG. 14
1
1
1
2