


-30-
For Machines Mfg. Since 5/11
14" TURN-X
®
Toolroom Lathe
PREPARATION
Spindle Break-In
Before subjecting the lathe to full loads, it
is essential to complete the spindle break-in
process as described below. This will ensure the
best results and maximum life of the precision
components inside the lathe.
The break-in procedure must be performed
in succession with the Test Run procedure
described in this manual, because many of the
test run steps prepare the lathe controls for the
break-in process.
Important: Do not perform the break-in
procedure independently from the Test Run
section—serious damage could occur to the lathe
if the controls are set differently than instructed
in that section.
Do not leave the lathe unattended during the
Spindle Break-In procedure. If your attention
is needed elsewhere during this procedure,
stop the lathe and restart the procedure later
from the beginning.
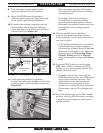
4. Use the foot brake to stop spindle rotation,
then run the lathe at 215 RPM for 10
minutes with the gearbox range lever on the
headstock in the L (low) position, and then
run the lathe another 10 minutes with the
lever in the H (high) position.
5. While the oil is still warm and any metal
particles are still suspended in the oil,
change the headstock and gearbox oil (refer
to Lubrication beginning on Page 66 for
detailed instructions).
6. Check the V-belt tension, and if necessary,
re-tension them (refer to V-Belts on Page
77 for detailed instructions).
Congratulations! The spindle break-in is
complete.
To perform the spindle break-in:
1. Successfully complete the Test Run
procedure beginning on Page 26.
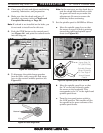
2. Using the spindle speed levers to set the
spindle speed, run the lathe for 10 minutes
at each of the spindle speeds.
Note: If necessary, refer to Setting Spindle
Speed on Page 50 for detailed instructions.
3. Use the foot brake to stop spindle rotation,
set the spindle speed at 2570 RPM, then
use the spindle lever to reverse the spindle
rotation and run the lathe for 10 minutes.
For your convenience, the adjustments listed
below have been performed at the factory.
However, because of the many variables involved
with shipping, we recommend that you at least
verify the following adjustments to ensure the
best possible results from your new machine.
Step-by-step instructions for these adjustments
can be found on the pages referenced below.
Factory adjustments that should be verified:
• Tailstockalignment(Page 40).
• Compoundandcrossslidebacklash
adjustment (Page 74).
• Gibadjustments(Page 75).
Recommended
Adjustments