


SBI-7426T-S3 Blade Module User’s Manual
3-4
3-3 Processor Installation
One or two processors may be installed to the mainboard of each blade unit. See
Chapter 1 for general information on the features of the blade unit and the Supermicro
web site for further details including processor, memory and operating system support.
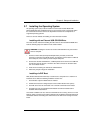
Removing a Processor
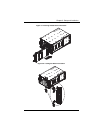
1. Power down and remove the blade unit from the enclosure (see Section 3-2:
Installing Blade Modules on page 3-1 for details).
2. Remove the cover of the blade unit (see "Removing/Replacing the Blade Cover" on
page 3-2).
3. Loosen the four screws that secure the heatsink to the mainboard.
4. Remove the heatsink by gently rotating it back-and-forth sideways with your fingers
to release it from the processor. Set the heatsink aside and upside-down so that
nothing comes into contact with the thermal grease on its underside.
5. Raise the lever of the processor socket up until the processor is released from the
socket, then lift the silver cover plate and remove the processor.
Installing a Processor
1. If present, remove the protective black PnP cap from the processor socket.
2. Raise the lever of the processor socket until it reaches its upper limit.
3. Lift the silver cover plate completely up and out of the way.
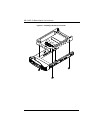
4. Align pin 1 of the processor with pin 1 of the socket (both are marked with a small
gold triangle) and gently seat the processor into the socket (Figure 3-3).
5. Check to make sure the processor is flush to the socket and fully seated.
6. Lower the socket lever until it locks.
7. To install the heatsink, apply thermal grease to the top of the processor. (If
reinstalling a heatsink, first clean off the old thermal grease with a clean, lint-free
cloth.)
WARNING: This action should only be performed by a trained service
technician. Allow the processor heatsink to cool before removing it.
WARNING: This action should only be performed by a trained service
technician.
NOTE: Be careful not to damage the pins protruding from the CPU socket.