


5
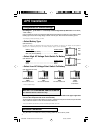
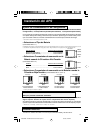
Permanent Mounting*
(See Diagram 3, p. 46).
• Install four 5 mm (#8) fasteners** into a rigid
horizontal
surface using the measurements in the
diagram. (Leave head of fasteners slightly above surface in order to engage keyhole slots molded
into the bottom of the APS's feet.)
• Place the APS's four keyhole slots over the four fasteners and slide APS forward or back to secure.
Install “L”-shaped bracket* to permanently hold APS in position.
* Recommended for vehicular installation or other application requiring permanent, secure mounting.
** All fasteners and brackets are user-supplied. Turn your APS OFF and disconnect from the wall outlet before
mounting.
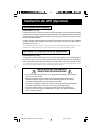
APS Installation (Optional)
Splash Guard Installation*
(See Diagram 4, p. 46).
Thread four 4 mm (#8) sheet metal screws through four holes in a rigid
horizontal
splash guard
measuring 175 mm x 225 mm, through four 25 mm long hollow spacers and into the four blind holes
in the top panel of your APS.
* Recommended for use in wet locations. All sheet metal screws, splash guard and hollow spacers are user-supplied. Turn your APS OFF
and disconnect from wall outlet before installation.
APS INSTALLATION
SAFETY WARNINGS
• Install your APS indoors, away from excess moisture or heat, dust or direct sunlight.
• Leave adequate space around all sides of the APS for proper ventilation. The heavier
the load of your connected equipment, the more heat will be generated.
• Do not remove or modify the ground pin of the APS's plug. Do not use two-prong
adapters with the APS's plug.
• Connect your APS to a three-wire, grounded AC power outlet. Do not plug your APS
into itself; this will damage the APS and void your warranty.
200002089 APS Manual 230 Volt Version.p65 5/31/00, 4:30 PM5