


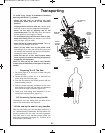

$?2=.?6;43<?&.D#=2?.A6<;@
<1F.;1.;1$<@6A6<;
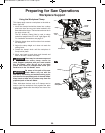
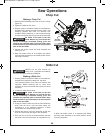
$<@6A6<; F<B? /<1F .;1 5.;1@
=
?<=2?9FA< :.820BAA6;4 2.@62?.;1
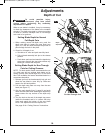
@.32? #/@2?C2 A52 3<99<D6;4 6;@A?B0A6<;@ @22 364B?2
• "2C2? =9.02 5.;1@ ;2.? 0BAA6;4 .?2. 22= 5.;1@
<BA@612A52T"<.;1@-<;2U
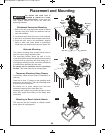
The “No Hands Zone” is an area 6 inches wide on left and
right side of the blade cutting path. Portion of the Fence
in this are also is considered a part of the “No Hands
Zone”.
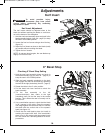
The “No Hands Zone” for zero miter and zero bevel cuts
is marked on the tool with lines and “No Hands” symbols
– Figure 28 A.
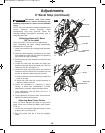
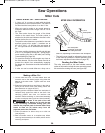
The “No Hands Zone” for all slide and miter right cuts is
defined in Figure 28 B.
The “No Hands Zone” for all slide and miter left cuts is
defined in Figure 28 C.
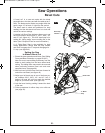
With all bevel cuts the “No Hands Zone” extends vertically
up to the bottom of the upper guard when the head
assembly is in the lowest cut position – Figure 28 D.
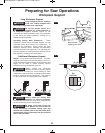
Use sliding base extensions, sliding fence, and additional
workpiece supports (see page 27) to properly support the
workpiece and hold or clamp it outside of the “No Hands
Zone”.
Workpiece can be held against table and fence by hand
only outside of the “No Hands Zone” – in figure 28.
9D.F@2;@B?2A5.AA52?26@.12>B.A2
32;02 .;1 /.@2 @B==<?A 6; A52 .?2.
D52?2:.A2?6.96@5291/F5.;1 If the workpiece must be
held within the “No Hands Zone” then use clamp to securely
hold the workpiece against the table and fence. Ensure that
the clamp does not interfere with cutting operation –
perform a dry run.
• Hold workpiece firmly to the fence to prevent movement.
• Keep hands in position until trigger has been released and
blade has stopped completely.
• Keep feet firmly on the floor and maintain proper balance.
• Follow the miter arm when mitering left or right. Stand
slightly to the side of the saw blade.
• Sight through the lower guard if following a pencil line.
• Before making any cut, with the power off, lower the blade
to preview the blade path - dry run.
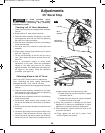
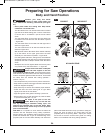
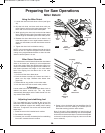
2 .D.?2 <3 A52 =.A5 <3 A52 @.D
/9.12 !.82. 1?F?B; D6A5 A52@.D
# /F 0<;1B0A6;4 . @6:B9.A21 0BAA6;4 0F092 .;1
</@2?C2 A52 =?<720A21 =.A5 <3 A52 @.D /9.12 22=
5.;1@.A92.@A@6E6;052@.D.F3?<:A52=?<720A21
=.A5<3A52@.D/9.12
%,Y%("SIt is important to know where the blade will
intersect with the workpiece during cutting operations.
Always perform the simulated cutting sequence with the
power tool switched OFF to gain an understanding of the
projected path of the saw blade. Mentally note where the
path of saw blade will fall and set up your work to keep your
hands and arms at least six (6) inches away from the
projected path of the spinning blade. Adjust your clamps
and fences so that the smooth lower guard and cutting
action is not interfered with during cutting operation.
0
5
1
0
1
5
2
0
2
5
3
0
3
5
4
0
4
5
5
0
5
0
4
5
4
0
3
5
3
0
0
5
1
0
1
5
2
0
2
5
3
0
3
5
4
0
4
5
5
0
5
0
4
5
4
0
3
5
3
0
0
5
1
0
1
5
2
0
2
5
3
0
3
5
4
0
4
5
5
0
5
0
4
5
4
0
3
5
3
0
0
5
1
0
1
5
2
0
2
5
3
0
3
5
4
0
4
5
5
0
5
0
4
5
4
0
3
5
3
0
*%""
!
*%""
!
6” 6”
6”
6”
6”
6”
"#"&-#"
FIG. 27
#%%'"#%%'
*%""
!
FIG. 28
BM 2610025580 05-13_BM CM8S 5/17/13 1:37 PM Page 24