


&.D#=2?.A6<;@
BAA6;4?<<C2@
T
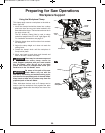
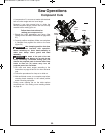
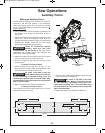
he depth stop adjustment is a feature used to limit
blade depth when cutting grooves in the workpiece.
NOTE: Read and understand all instructions on page
1
6 in the Adjustments section on “Setting Blade
Depth for Non-Through Cuts for Cutting Grooves.”
NOTE: For best results, Bosch recommends the use
of a table saw with an optional dado blade set for
cutting grooves and non-through cuts. In the event
this is not available, the feature described below is a
convenient alternative.
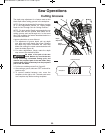
A groove should be cut as a slide cut.
1. For adjustment of groove depth, pull out depth
stop plate and rotate depth stop screw. Rotating
the depth stop screw clockwise will raise saw
blade and rotating the screw counterclockwise will
lower the blade (figure 44).
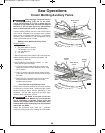
2. For minor adjustments, simply rotate the depth
stop screw to the desired location.
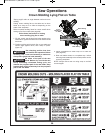
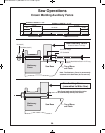
2 .D.?2 <3 A52 =.A5 <3 A52 @.D
/9.12!.82.1?F?B;D6A5A52@.D
#33 /F 0<;1B0A6;4 . @6:B9.A21 0BAA6;4 0F092 .;1
</@2?C2A52=?<720A21=.A5<3A52@.D/9.1222=
5.;1@.A92.@A@6E6;052@.D.F3?<:A52=?<720A21
=.A5<3A52@.D/9.12
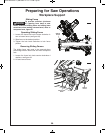
3. Cut the two outside grooves first, figure 45.
4. After cutting a groove, shut saw “OFF” and wait for
blade to stop.
5. To remove material between cuts, move the
workpiece to the right or left. The saw must come
to a complete stop before moving workpiece.
Workpiece
Outside Grooves
FIG. 45
FIG. 44
2=A5
&A<=$9.A2
2=A5
&A<=&0?2D
*%""
!
BM 2610025580 05-13_BM CM8S 5/17/13 1:37 PM Page 33