


la pieza de trabajo (vea la Fig. 14). Si
usa poca corriente el reborde luciría
demasiado pronunciado e irregular.
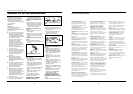
ANGULO
Este es el ángulo en que se sostiene el
electrodo durante el proceso de soldar.
Al usar el ángulo adecuado se garantiza
una penetración y formación de reborde
adecuada. Al necesitar diferentes
posiciones de soldar y uniones, el
angulo del electrodo juega un papel
más importante. Hay 2 factores en este
ángulo: ángulo de desplazamiento y de
trabajo. (vea la Fig. 11)
El ángulo de desplazamiento es el
ángulo en la línea donde se está
soldando y puede variar entre 5º y 45º
de la línea vertical, según sean las
condiciones de trabajo.
El ángulo de trabajo es el angulo desde
la línea horizontal, medido en angulos
a la línea de soldar.
Para la mayoría de las aplicaciones se
puede usar ángulos de desplazamiento
y de trabajo de 45º. Para aplicaciones
especificas, debe consultar un texto de
soldar con arcos eléctricos o un libro de
referencias para soldadores.
Nota: Si es zurdo debe soldar de
derecha a izquierda, de lo contrario de
izquierda a derecha. Siempre apunte el
electrodo como se indica en la figura.
LONGITUD DEL ARCO
Esta es la distancia entre la pieza de
trabajo y el extremo del electrodo, la
distancia que el arco se debe desplazar.
Para generar el calor necesario para
soldar es esencial obtener la longitud
adecuada del arco (Vea la Fig. 10). Si el
arco es demasiado largo se produce un
arco inestable, se reduce la penetración,
aumenta el salpiqueo, y los rebordes
son planos y anchos. Si el arco es
demasiado corto no se produce
suficiente calor para derretir la pieza de
trabajo, el electrodo tiene la tendencia
a pegarse, la penetración no es la
adecuada y rebordes son disparejos e
irregulares. La longitud del arco no
debe ser mayor al diámetro de la vara.
Al soldar debe escuchar un sonido
similar al que se produce al freir
tocineta.
VELOCIDAD DE DESPLAZAMIENTO
Es la velocidad con que se desplaza el
electrodo por el área a soldar. El
diámetro y tipo de electrodo, amperaje,
posición y el grosor de la pieza de
trabajo son algunos de los factores que
afectan la velocidad de desplazamiento
necesaria para lograr una soldadura de
primera (Vea la Fig. 10). Si la velocidad
es demasiado rápida, el reborde es
angosto y las ondas puntiagudas como
se muestra en la figura. Si la velocidad
es muy lenta, el metal soldado se
acumula y el reborde es alto y ancho.
LIMPIEZA DE ESCORIAS
Use ante-
ojos de
seguridad aprobados por la asociación
norteamericana ANSI (ANSI Standard Z87.1)
(o alguna organización similar en sus
respectivos paises) y ropa de protección
para sacar la escoria. Los residuos calientes
le podrían ocasionar heridas a las personas
que se encuentren en el área de trabajo.
Una vez que haya terminado de soldar,
espere a que las piezas soldadas se
enfríen. Una capa protectora que
llamaremos escoria cubre el reborde
para evitar que los contaminanates en
el aire reacionen con el metal derretido.
Cuando el metal se haya enfriado un
poco y no esté al rojo vivo, podrá
limpiar el escoria. Esto lo puede hacer
con una rebabadora. Golpee
suavemente la escoria con el martillo
hasta que logre despegarla. Finalmente,
use un cepillo de alambre para terminar
de limpiar. Cuando vaya a soldar en
varios pasos deberá limpiar las escorias
antes de cada paso.
POSICIONES PARA SOLDAR
Básicamente hay 4 posiciones para
soldar: plana, horizontal, vertical y por
encima de la cabeza. Soldar en la
posición plana es lo más fácil ya que la
velocidad puede aumentarse, el metal
derretido se chorrea menos, se puede
lograr una mayor penetración y el
trabajador se cansa menos. Para soldar
en esta posición se usan ángulos de
desplazamiento y de trabajo de 45º.
Otras posiciones requieren técnicas
diferentes tales como paso entretejido,
circular o cruzado. Para completar este
tipo de soldadura se requiere más
experiencia en la materia.
Soldar por encima de la cabeza es la
posición más dificil y peligrosa. La
temperatura a usar y el tipo de
electrodo dependen de la posición.
Siempre debe tratar de soldar en la
posición plana. Para aplicaciones
especificas debe consultar un libro de
referencias para soldadores.
PASOS
Algunas veces deberá usar más de un
!
ADVERTENCIA
34
Manual de instrucciones y lista de repuestos
Soldadora De Arco Con Electrodo Revestido
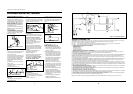
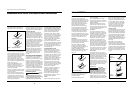
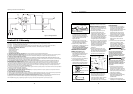
Angulo de desplazamiento
Angulo de trabajo
5º - 45º
Figura 11 - Angulo de soldadura
Current
The correct current involves the
adjustment of the welding machine to
the required amperage setting. Current
represents the actual flow of electricity
and is regulated by a knob on the
welder. The current used depends on
the size (diameter) and type of
electrode used, position of the weld,
and the thickness of the work piece.
Consult specifications listed on the
electrode package or generalized chart
in the Operation section. Excessive
current burns through light metals,
and the weld bead is flat and porous or
the bead undercuts the work piece (See
Fig. 14). The bead appears high and
irregular if the current is too low.
Weld Angle
Weld angle is the angle at which the
electrode is held during the welding
process. Using the correct angle ensures
proper penetration and bead
formation. As different welding
positions and weld joints become
necessary, electrode angle becomes an
increasingly important factor in
obtaining a satisfactory weld.
Electrode angle involves two positions -
travel angle and work angle. (See
Figure 11.)
Travel angle is the angle in the line of
welding and may vary from 5º to 45º
from the vertical, depending on
welding conditions.
Work angle is the angle from
7
www.chpower.com
Model WS2800
horizontal, measured at right angles to
the line of welding.
For most applications, a 45º travel
angle and 45º work angle is sufficient.
For specific applications, consult an arc
welding handbook.
Note: Right handed welders should
weld from left to right. Left handed
welders should weld from right to left.
The electrode should always point into
the weld puddle as shown.
Arc Length
Arc length is the distance from the
work piece to the tip of the electrode,
the distance which the arc must travel.
A proper arc length is essential to
generate the heat needed for welding
(See Fig. 14). An arc that is too long
produces an unstable arc, reduces
penetration, increases spatter, and
causes flat and wide beads. Too short
an arc does not create enough heat to
melt the work piece, the electrode has
a tendency to stick, penetration will be
poor, and uneven beads with irregular
ripples result. A proper arc should be
no longer then the diameter of the rod.
The sound of a proper arc is a steady,
crisp sizzle, similar to bacon frying.
Travel Speed
The travel speed is the rate at which
the electrode is moved across the weld
area. Factors such as diameter and type
of electrode, amperage, position, and
work piece material thickness all effect
the speed of travel necessary for
completing a good weld (See Fig. 14).
When the speed is too fast, the bead is
narrow and bead ripples are pointed as
shown. When the speed is to slow, the
weld metal piles up and the bead is
high and wide.
Slag Removal
Wear ANSI
approved safety
glasses (ANSI Standard Z87.1) and
protective clothing when removing
slag. Hot, flying debris can cause
personal injury to anyone in the area.
After completing the weld, wait for the
welded sections to cool. A protective
coating called slag now covers the weld
bead which prevents contaminants in
!
WARNING
the air from reacting with the molten
metal. Once the weld cools to the point
that it is no longer glowing red, the
slag can be removed. Removal is done
with a chipping hammer. Lightly tap
the slag with the hammer and break it
loose from the weld bead. The final
clean-up is done with a wire brush.
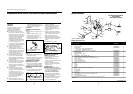
When making multiple weld passes,
remove the slag before each pass.
Welding Positions
Four basic welding positions can be used;
flat, horizontal, vertical, and overhead.
Welding in the flat position is easier than
any of the others because welding speed
can be increased, the molten metal has
less tendency to run, better penetration
can be achieved, and the work is less
fatiguing. Welding is performed with the
electrode at a 45º travel angle and 45º
work angle.
Other positions require different
techniques such as a weaving pass,
circular pass, and jogging. A higher skill
level is required to complete these welds.
Overhead welding is the least desirable
position as it is the most difficult and
dangerous. Heat setting and electrode
selection will vary depending upon the
position.
Travel Angle
Work Angle
5º - 45º
Figure 11 - Weld Angle
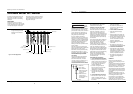
Figure 12 -
Multiple Weld
Passes
Figure 13 -
Fillet Welds