


5-6
Cisco MGX Route Processor Module (RPM-PR) Installation and Configuration Guide
Release 2.1, Part Number 78-12510-02 Rev. C1, August 31, 2004
Chapter 5 Configuring the MGX RPM-PR
Booting the RPM-PR
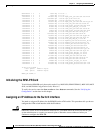
switch autoSynch off
!
ip kerberos source-interface any
ip classless
no ip http server
!
!
!
line con 0
transport input none
line aux 0
line vty 0 4
no login
!
end
Step 8 Enter copy run start at the prompt to write the configuration to the router NVRAM memory.
Router#copy run start
Building configuration...
[OK]
The IP address is now active and ready to use.
Note The ATM interface can be further configured with logical subinterfaces as needed. To see how to
configure subinterfaces on the ATM switch interface, see Chapter 6, “Configuring PNNI
Communications,” the “Creating and Configuring a Switch Subinterface” section.
Booting RPM-PR Using TFTP from a TFTP Server
Once you add the IP address, you can configure the RPM-PR card to load runtime software from a TFTP
server.
Note This procedure is optional. The preferred procedure for loading the runtime software from the
PXM-45 hard drive is described earlier in “Initializing the RPM-PR Card.”
Use the following procedure to configure the RPM-PR card to load runtime software from a TFTP
server:
Step 1 Enter cc <RPM-PR card slot #> to access the router card.
The router prompt (>) appears.
Step 2 Enter enable and your password, when prompted, so that you can enter privileged commands.
Step 3 Enter config terminal to enter global configuration mode.
Step 4 Enter boot system tftp followed by the address of the server from which you want to download the boot
file as shown in this example.
Router(config)#boot system tftp /tftpboot/balbalas/rpm-js-mz 171.69.1.129
Step 5 Enter end or press Ctrl-Z to exit configuration mode.
Router(config)#end