


EN
ENGLISH
Page -14-
Clarke
®
Operator's Manual (EN) - DC Propane Burnisher
Preparing The Machine For Use
BEFORE using any type of powered equipment, proper
safety dictates you should visually inspect it.
1.
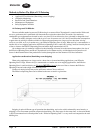
Adjusting the Handle -
(a) Adjust the handle to a comfortable height by
pulling outward on the two spring-loaded pins on
each side of the handle.
(b) While holding the pins out, adjust the handle to
the height desired.
(c) Release the pins so that they insert themselves
into the locked positions. NOTE: It may be easier
to stand to one side of the handle and reach
across to the other side to make the adjustment.
2.
Bonnet Filter
- Make sure the bonnet air filter atop the
engine is clean. It should be changed hourly and
thoroughly cleaned before reuse.
3.
Oil Level
-
(a) Check the engine OIL LEVEL.
(b) With the buffer sitting in a level position, unscrew
the yellow oil filler cap, pull out, and wipe dipstick
off with a clean cloth.
(c) Insert the dipstick into the tube, but DO NOT
screw it back in.
(d) Pull the dipstick out and check the oil level
making sure the oil level is in the operating range
(grid area) shown on the dipstick. If the oil level is
in the "ADD" range, add enough engine oil to
bring the oil level to the operating range. NOTE:
NEVER overfill the engine oil as this can lead to
irreparable damage to the engine.
4.
Filling the Tank-
Fill the tank following the instructions
as given under the previous heading: "Refilling And
Storing Propane Tanks." In addition, if your buffer
came with an "80% Safety Fill Tank" then it should
ONLY be filled through the threaded valve with the
larger diameter that is covered by a yellow cap to
ensure a "Full" level that is safe.
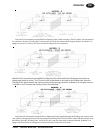
5.
Pad and Pad Holder
-
Inspect the condition of the pad and pad holder.
(a) Adjust handle to it's extreme upright position.
(NOTE: Pins should be in the hole marked
"TILTBACK").
(b) Grabbing the handle with both hands and placing
your foot on the back deck of the burnisher for
stability, pull back on the handle and tilt the
machine back.
(c) Let the handle rest on the floor to hold the
machine in the upright position.
(d) Go to the pad side of the machine for inspection
and/or replacement. Is there a pad? Is it properly
attached? What is it's condition? Ensure the pad
is clean and has at least a thickness of 1/3 of an
inch. Always turn off the engine before checking
the pad.
6.
Tank and Fuel Lines
- The tank has already been
covered but do the fuel lines show any sign of wear
and tear, such as cracks or any corrosion? Screw the
brass fuel line fitting onto the tank service valve, hand
tight only. This connection MUST be secure because
the service valve has a safety valve inside it which will
only open if the brass fuel line fitting is COMPLETELY
seated into the service valve.
How to Operate the Machine
7.
Dust Containment Area
-
Check the dust containment area and make sure
that it is clean. This is the area underneath the
propane tank.
(a) Remove the propane tank and then lift the black
lid and locate the automotive-type filter.
(b) Inspect the filter. Is it dirty? Does it need to be
cleaned or replaced? Make sure that the trough -
that is outside of and below the level of the filter -
is clean.
8.
Dust Skirt -
Check out the condition of the skirt that
surrounds the deck. Is it in good condition? What is
the condition of the rubber boot that connects the skirt
to the rear part of the deck? Replace the boot if it is
ripped or torn.
Starting the Engine
1. Open the service valve on the propane tank by turning
counterclockwise, about one and a half turns.
2. Ensure the buffer is tilted back so that the pad is off the
floor
on all machines without a clutch.
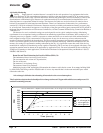
3. The Kawasaki 17 hp twin cylinder is designed to be
started with the throttle in the idle position. This creates
a vacuum necessary to open the lock-off valve inside
the regulator. Actuation of the throttle lever will keep
the lock-off valve from opening and the engine from
getting fuel so the engine will not start. Proper mainte-
nance will insure easy starting.
4. Engage starter for a MAXIMUM of 5 to 6 seconds or
until the engine fires. Serious starter damage will result
if this is exceeded and the warranty may not apply.
5. Operate the engine at half throttle for approximately two
minutes for proper warm-up. Then advance to full
throttle for best results.
NOTE: If the engine refuses to start, see the Trouble
Shooting Guide.
Stopping The Engine
1. Close the service valve on the propane tank, by turning
clockwise. This consumes all of the propane that is still
in the fuel system.
2. ALWAYS allow the engine to run until it stops from lack
of fuel, and then shut off the key switch. ** ONLY IN AN
EMERGENCY should the "kill switch" on buffer be
used.
3. Disconnect the fuel line from the tank.
4. REMEMBER, when you are finished with the machine,
store the propane tank outside the building, in a safe
place away from heat or direct sunlight.