


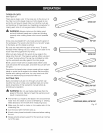
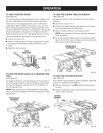

CUTTINGAIDS
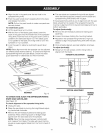
See Figure 22.
Push sticks are devices that may be used for pushing a
workpiece through the blade in any rip cut. When mak-
ing non-through cuts or ripping narrow stock, always use
a push stick, push block, and/or featherboard so your
hands do not come within 3 inches of the saw blade.
They can be made in various sizes and shapes from scrap
wood and used in a specific project. The stick must be
narrower than the workpiece, with a 90° notch in one end
and shaping for a grip on the other end.
A push block has a handle fastened by recessed screws
from the underside. Use push blocks for narrow cuts and
all non-through cuts.
CAUTION: Be sure the screws in a push block are
recessed to avoid damaging the saw or workpiece.
PUSHBLOCKS
Fig. 22
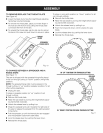
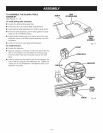
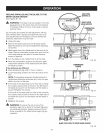
AUXILIARY FENCE
An auxiliary fence is a device used to close the gap be-
tween the rip fence and the saw table. Always make and
use and auxiliary fence when ripping material 1/8 in. or
thinner.
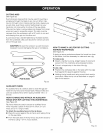
HOW TO MAKE AND ATTACH AN AUXILIARY
FENCE (FOR RIP CUTTING THIN WORKPIECE)
See Figure 23.
Rip fence holes are used to secure an auxiliary fence
which requires a piece of wood 3/4 in. thick, 3-1/2 in.
wide, and 21 in. long to make.
To attach the auxiliary fence to the rip fence:
[] Place the wood against the rip fence and resting firmly
on the saw table.
[] From the back side of the rip fence, secure the wood to
the fence using 1-3/4 in. wood screws.
31/2in.
3/4in..
Fig. 23
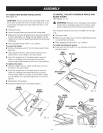
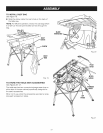
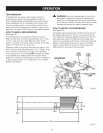
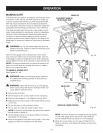
HOW TO MAKE A JIG (FOR RIP CUTTING
NARROW WORKPIECE)
See Figure 24.
If ripping a narrow workpiece places the hands too close
to the blade, it will be necessary to make and use a jig.
To make a jig:
[] Attach a handle to a long, straight piece of wood and
secure from the underside using recessed screws.
[] Cut an L-shaped stop in the side of the jig.
To use a jig:
[] Position the workpiece flat on the table with the edge
flush against the jig and against the stop.
[] Holding the jig handle and using a push block and/or
push stick, make the rip cut as described on page 31
later in this section.
STOP
JIG
HANDLE
JIG
Fig. 24
23