


6
A separate electrical circuit should be used for your machines. This circuit should not be less than #12 wire and should
be protected with a 20 Amp time lag fuse. If an extension cord is used, use only 3-wire extension cords which have 3-
prong grounding type plugs and matching receptacle which will accept the machine’s plug. Before connecting the
machine to the power line, make sure the switch (s) is in the “OFF” position and be sure that the electric current is of
the same characteristics as indicated on the machine. All line connections should make good contact. Running on low
voltage will damage the machine.
DO NOT EXPOSE THE MACHINE TO RAIN OR OPERATE THE MACHINE IN DAMP LOCATIONS.
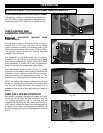
POWER CONNECTIONS
MOTOR SPECIFICATIONS
The 22-610 has a 10 HP three phase motor that comes wired at 230 volts and 60 HZ alternating current. The motor
is also capable of being wired for 460 volt operation, but this connection must be done by a qualified electrician and
conform to the National Electric Code and all local codes and ordinances.
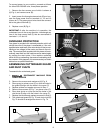
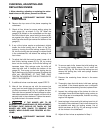
FOREWORD
FUNCTIONAL DESCRIPTION
NOTICE: THE PHOTO ON THE MANUAL COVER ILLUSTRATES THE CURRENT PRODUCTION
MODEL. ALL OTHER ILLUSTRATIONS CONTAINED IN THE MANUAL ARE REPRESENTATIVE ONLY
AND MAY NOT DEPICT THE ACTUAL COLOR, LABELING OR ACCESSORIES AND ARE INTENDED
TO ILLUSTRATE TECHNIQUE ONLY.
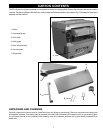
The Delta Indusrial Model 22-610 is a 24
3
/4" Planer with a 10 HP, three-phase motor capable of 230 volt or 460 volt
operation with an LVC magnetic starter and automatic reset overload protection; 4-knife cutterhead, infeed and out-
feed rollers, chipbreakers, dust chute, knife-setting gauge and wrench.
THIS MACHINE MUST BE GROUNDED WHILE IN USE TO PROTECT THE OPERATOR FROM
ELECTRIC SHOCK.
GROUNDING INSTRUCTIONS
These machines are not supplied with power cords and they are intended to be permanently connected to the building’s ele-
crical system. All wiring must be done by a qualified electrician and conform to the National Electric Code and all local codes
and ordinances. For wiring instructions, see section “ELECTRICAL CONNECTIONS” in this manual.