


15
Make sure that the switch is in the “OFF”
position before plugging cord into outlet. Do not touch
the plug’s metal prongs when unplugging or plugging in
the cord.
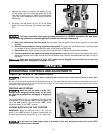
OPERATION
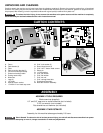
OPERATIONAL CONTROLS AND ADJUSTMENTS
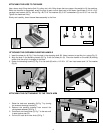
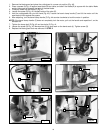
Fig. 30
G
H
J
K
B
A
In the event of a power outage (such as a breaker or fuse trip), always move the switch to the “OFF”
position until the main power is restored.
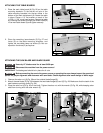
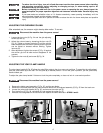
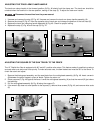
IMPORTANT: When the machine is not in use, lock the
switch in the “OFF” position to prevent unauthorized use
by removing and storing the key (B) Fig. 31 in a safe place.
LOCKING SWITCH IN THE "OFF" POSITION
The on/off switch (A) Fig. 31 is located at the front of the
cuttinghead. To turn the saw “ON”, move the switch (A)
up to the “ON” position. To turn the saw “OFF”, move
the switch down to the “OFF” position.
CONNECTING THE SAW TO THE POWER SOURCE
To reduce the risk of injury, before connecting saw to power source, make sure the switch is in the "OFF"
position.
Be sure your power supply agrees with the nameplate marking. AC Only means that your saw will operate on alternating current only. A
voltage decrease of 10 percent or more will cause a loss of power and overheating. All DELTA tools are factory tested. If this tool does
not operate, check the power supply.
Fig. 31
STARTING AND STOPPING
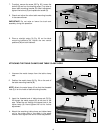
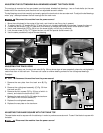
The lower retractable blade guard provides protection in a LATERAL direction to the saw blade.
Use the following guidelines to eliminate potential hazards with the lower blade guard.
A) Keep your hands away from the guard. As the blade cuts, the guard rises to leave a portion of the blade
exposed.
B) Shut off the power before freeing a jammed lower guard. The guard can become jammed in previous kerfs
in the table or fence. Always anticipate the path of the guard and the blade.
C) Use caution when bevel cutting to ensure that the lower guard is never pinched toward the blade.
D) The lower guard can jam against the fence during narrow in-rips. Should the guard jam against the fence,
disconnect the saw from power source, wait for the blade to stop, then lift the blade guard and rest it on top of
the fence.
Make sure that the switch is in the “OFF” position before plugging cord into outlet. Do not touch the
plug’s metal prongs when unplugging or plugging in the cord.
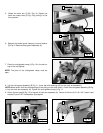
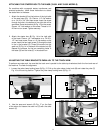
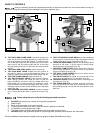
4. Remove the screw, flat washer and spacer (G) Fig.
30 that fasten the front inside leaf guard (H) to the
front end of blade guard (J). Attach the blade guard
(J) to the motor assembly with a locking rod and
washer (K).
5. Re-attach the leaf guard (H) Fig. 30 to the blade
guard (J) using the screw, flat washer and spacer
(G).