


25
IMPORTANT: In certain applications, you may need to use two push sticks, and/or featherboards.
Keep all push sticks, featherboards, etc. handy so that you can reach them without having to get near the blade.
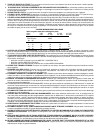
Fig. 64
C
B
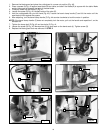
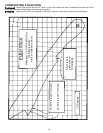
RIPPING
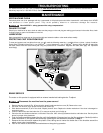
To reduce the risk of injury, turn unit off and disconnect the machine from the power source before installing
and removing accessories, before adjusting or changing set-ups, or when making repairs. An accidental start-up can cause
injury.
NEVER touch the "free end" of the workpiece or a "free piece" that is cut off while the power is "ON" and/or
the saw blade is rotating. The piece may contact the blade resulting in a thrown workpiece and possible injury.
Keep the saw blade guard, splitter, and anti-kickback teeth in place and operating properly. Keep teeth sharp.
If teeth are not operational, return your unit to the nearest authorized Delta service center for repair. The splitter must be
in alignment with the saw blade and the teeth must stop a kickback once it has start. Check their action before ripping by
pushing the wood under the anti-kickback teeth. The teeth must prevent the wood from being pulled toward the front of the
saw.
A rip fence should ALWAYS be used for ripping operations to prevent loss of control and personal injury.
NEVER perform a ripping operation freehand. ALWAYS lock the fence to the rail.
When bevel ripping and whenever possible, place the fence on the side of the blade so that the blade is tilted
away from the fence and hands. Keep hands clear of the blade and use a push stick to feed the workpiece if there is less
than 6" (152mm) between the fence and the blade.
Never feed the workpiece into the outfeed end of the blade guard.
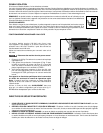
Fig. 63
B
C
A
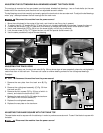
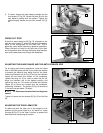
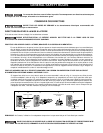
OUT-RIPPING
Out-ripping is generally the same as ripping except that you
clamp the yoke at a right angle to the track arm with the
blade guard facing the FRONT of the machine. Position the
cuttinghead on the out-rip scale to the desired setting and
clamp it in position. Feed the workpiece from the left side of
the saw. A typical out-ripping operation is illustrated in Fig.
63.
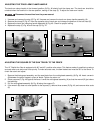
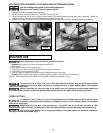
IN-RIPPING
In-ripping is generally the same as ripping except that you
clamp the yoke at a right angle to the track arm with the
blade guard facing the REAR of the machine. Position the
cuttinghead on the in-rip scale to the desired setting and
clamp it in position. Feed the workpiece from the right side
of the saw. A typical in-ripping operation is illustrated in Fig.
64.
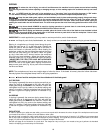
PUSH-STICKS
In order to operate your radial arm saw safely, you must use a push-stick whenever the size or shape of the workpiece would cause
your hands to be within 6" (152mm) of the saw blade or other cutter.
No special wood is needed to make a push-stick as long as it's sturdy and long enough. A length of 12" 9305mm) is recommended
with a notch that fits against the edge of the workpiece to prevent slipping. It's a good idea to have several push-sticks of the same
length [12" (305 mm) with different size notches for different workpiece thicknesses.
See the next page for an illustration of a push-stick. The shape can vary to suit your own needs as long as it performs its intended
function of keeping your hands away from the blade.
NOTE: The workpiece must have one straight edge to follow the fence. If the board is bowed, place the hollow side down.
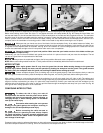
Securely tighten the cuttinghead clamp knob for all ripping operations.
Ripping is a lengthwise cut through board along the grain.
Clamp the track arm at “0” on the miter scale. Position and
clamp the yoke so that the blade is parallel to the fence in
either the inboard or outboard position. When feeding the
workpiece, make sure that one edge rides against the fence
with the flat side resting on the table. Lower the guard
on the in-feed side until it almost touches the workpiece
(Fig. 63) to act as a holddown. Adjust the splitter and anti-
kickback fingers (A) Fig. 63 as described under the section
“ADJUSTING THE SPLITTER AND ANTI-KICKBACK
FINGERS” in this manual. Keep your hands well away from,
and to the side of the blade. When ripping narrow work,
always use a push stick (Fig. 64) to push the work between
the fence and blade.