


18-ENGA18791
Air Filter - Inspection and Replacement
Hot surfaces. Risk of burn. Compressor heads are exposed
when filter cover is removed. Allow compressor to cool prior
to servicing.
Keep the air filter clean at all times. Do not operate the air
compressor with the air filter removed.
A dirty air filter will not allow the compressor to operate at full capacity. Keep the
air filter clean at all times.
1. Remove air filter.
2. Remove the air filter cover.
3. Remove the air filter from filter cover.
IMPORTANT: Do not operate the compressor with the air filter removed.
4. Place new air filter into filter cover. Refer to the Repair Parts for the correct
part number.
5. Replace air filter cover and reassemble air filter to pump.
Belt - Replacement
(Refer to the Parts Manual for replacement belt part number.)
Serious injury or damage may occur if parts of the body or
loose items get caught in moving parts. Never operate the
outfit with the belt guard removed. The belt guard should be removed only
when the air compressor power is disconnected.
1. Turn air compressor off, lock out the power supply, and relieve all air pres-
sure from the air tank.
2. Remove the belt guard.
3. Mark pump position on saddle.
4. Loosen the motor mounting screws and slide the motor toward the air com-
pressor.
5. Remove the belt and replace with a new one.
6. See the "Adjust Belt Tension" before tightening motor mounting screws.
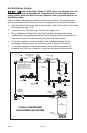
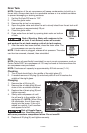
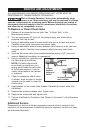
Adjusting Belt Tension
1. Slide motor into original position, line the motor up with the mark made
earlier on saddle.
2. Tighten two outside motor mounting screws enough to hold the motor in
place for checking pulley and
Downward Force
Deflection
flywheel alignment.
3. The belt should deflect 3/16" at
midway between the pulley and
the flywheel when a 5-10 pound
weight is applied at the midway
point.
4. When proper belt tension is
achieved, tighten all four mo-
tor mounting screws. See Parts
manual for torque specifications.