


Installation
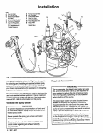
Connect the Air Line
Install an air line filter (H) to ensure a clean, dry air
supply to the gun. Dirt and moisture in the line can
ruin the appearance of your finished piece.
Install Air Pressure Regulator 1 lo-776 (F) to control
the air pressure to the gun and limit it to 10 psi (0.7
bar)
Maximum Operating Air Pressure.
Install a bleed-type master air valve (C) on the main
air line. Install a bleed-type master air valve or air
pressure relief valve (P), which is easily accessible
from the pump and downstream from the pump air
regulator (E).
NOTE: The gun air inlet has a l/4-1 8 npsm
@1/4-l 9) compound male thread that is compatible
with NPSM and BSP female swivel connectors.
Connect the air hose (K) from the air supply to the
gun air inlet.
Connect the Fluid Line
Install a fluid pressure regulator (M) to control fluid
pressure to the gun. Some applications require
fine-tuned control of fluid pressure. You can control
fluid pressure more accurately with a fluid pressure
regulator than by regulating the air pressure to the
w-v.
Install fluid drain valve(s) (J) to help relieve fluid
pressure.
NOTE: The gun fluid connector (6) has a l/4-18
npsm (Rl/4- 19) compound male thread that is com-
patible with NPSM and BSP female connectors.
Install an in-line fluid filter (see part no. 210-500 in
the Accessories section) on the gun fluid connector
(B) to avoid clogging the spray tip with particles from
your fluid.
Connect the grounded fluid hose (L) to the gun fluid
connector (B) or optional in-line filter.
Grounding
WARNING
To reduce the risk of serious injury, be sure your
entire system is properly grounded. Read FIRE
AND EXPLOSION HAZARD on page 4. The gun
is grounded by connecting it to a properly
grounded pump and hose.
Operation
WARNING
The wallet sized warning card 179-960, provided
with the gun, should be available and easily
accessible at all times for anyone operating or
servicing this equipment. The card contains
important information on what to do if a fluid injec-
tion injury occurs. Additional cards are available at
no charge from Grace.
I
1
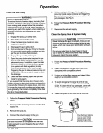
How the Air-Assisted Airless
Spray Gun Operates
The spray gun has a built-in lead and lag operation.
When triggered, the gun begins emitting air before
the fluid is discharged. When the trigger is released,
the fluid stops before the air flow stops. This helps
assure the spray is atomized and prevents fluid
buildup on the air cap.
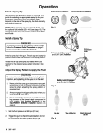
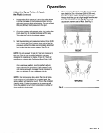
Note that the air-assisted airless spray gun differs
from an air spray gun in that increasing the pattern air
reduces the pattern width. To increase the pattern
width, less pattern air or a larger size tip must be
used.
The air-assisted airless gun combines airless and air
spraying concepts. The spray tip shapes the fluid into
a fan pattern, similar to a conventional airless spray
tip, but at a lower pressure. Air from the air cap fur-
ther atomizes the fluid and completes the atomization
of the paint tails into the pattern. The pattern adjust-
ment valve controls the width of the pattern.
Remember, this is not an air spray gun; for your
safety be sure to read and follow the Warnings on
pages 3 to 5 and throughout the text of thus
307-947 7