


Repair
RepairRepair
Repair
RequiredRequired
Required
ToolsTools
Tools
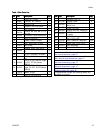
• Phillips screwdriver
• Flat blade screwdriver
• 3 mm, 4 mm, and 5 mm Allen wrenches
• 10 mm, 1/2 in. 11/16 in., and 3/4 in. wrenches
• Torque wrenches
• Waste container
• High-temperature anaerobic thread sealant
• High-temperature lubricant
• Anti-seize
• Crimp tool
BeforeBefore
Before
BeginningBeginning
Beginning
RepairRepair
Repair
Material inside the applicator can be near setpoint
temperature. Wear protective clothing to avoid
severe burns.
1. Turn off the melter system. See melter manual
for shutdown instructions.
2. Relieve pressure. See
Pressure Relief Procedure, page 12.
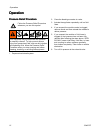
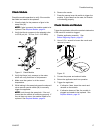
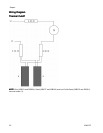
3. Disconnect the cordset (F) from the heated hose.
Figure 13 Disconnect Cordset
4. Disconnect M8 solenoid electrical connector (N).
ReplaceReplace
Replace
HeaterHeater
Heater
CartridgeCartridge
Cartridge
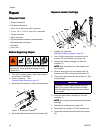
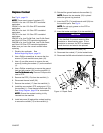
1. Disable the applicator.
See Before Beginning Repair, page 20.
2. Use a Phillips screwdriver to remove the four
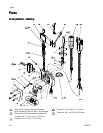
screws (15) and manifold cover plate (18).
3. Remove the heater cartridges (3) from the
manifold (1).
NOTE:NOTE:
NOTE:
Note the placement of the heaters and
lead lengths.
4. Remove butt splices (4) from heater wires (3),
thermal cutoff (29), and cordset wire leads (17).
5. Crimp new heater wires into new splices (4). See
wiring diagram.
NOTICENOTICE
NOTICE
To prevent a short to ground and blowing a
MZLP fuse, ensure bare wires are covered
and ber glass tape and sleeves are centered
over splices.
6. Insert the new heater cartridges (3) into the
manifold (1).
NOTE:NOTE:
NOTE:
Do not apply thermal grease to the heater
cartridge.
7. Reinstall the manifold cover plate (18).
8. Reconnect the cordset (17) to the heated hose.
9. Reconnect the M8 solenoid electrical connector
(N).
20334627D