


Installation
InstallationInstallation
Installation
MountingMounting
Mounting
NOTICENOTICE
NOTICE
To prevent heat transferring into other components
of the packaging line, ensure that the insulator is
installed.
LowLow
Low
ProleProle
Prole
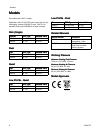
Models:Models:
Models:
Use a 3/4 in. (19 mm) wrench
to adjust nuts that control position of applicator on
threaded rod.
AllAll
All
OtherOther
Other
Models:Models:
Models:
See the following instructions.
Mount manifold on up to a 1/2 in. (12 mm) diameter
bar using mounting clamp (H) to hold the applicator
in place and ensure adhesive is applied properly.
For optimal mounting strength of a slim model, use
a 7/16 hex bar.
NOTE:NOTE:
NOTE:
Slim Standard Dual and Standard Quad
models use a 5 mm Allen wrench.
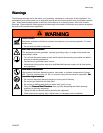
1. Use an appropriate wrench to loosen the
mounting clamp and slide the applicator on the
mounting bar.
2. Tighten the mounting clamp. Torque to 144 in-lb
(16.2 N•m).
NOTE:NOTE:
NOTE:
Provide enough room to access sides of
applicator for maintenance and repair.
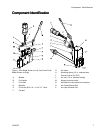
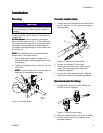
Figure 3 Mounting Clamp
ConnectConnect
Connect
HeatedHeated
Heated
HoseHose
Hose
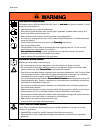
1. Connect the hose uid outlet to the manifold uid
inlet (E). Use two 11/16 in. wrenches to tighten
the hose tting.
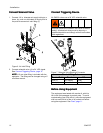
Figure 4 Connect the Heated Hose
2. Connect the cordset (F) to the hose.
3. Connect the hose inlet to the melter system
outlet. See the heated hose manual for
installation guidelines.
4. Connect the hose cordset to melter. See the
heated hose manual for installation guidelines.
RecommendedRecommended
Recommended
AirAir
Air
SetupSetup
Setup
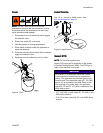
1. Connect tubing from the air lter (Graco part
106148) to the air regulator.
Figure 5 Connect the Air Supply
2. Set the air regulator to 80 psi (5.5 Bar, 0.5 MPa).
3. Connect tubing from the air regulator to the
applicator solenoid.
334627D9