


308018 17
Maintenance
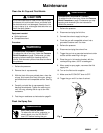
Clean the Air Cap and Fluid Nozzle
CAUTION
Do not use metal tools to clean the air cap or spray
tip holes as this could scratch them, and make sure
the electrode wire is not damaged. Scratches in the
air cap or spray tip or a damaged electrode wire can
distort the spray pattern.
Equipment needed:
D Soft bristle brush
D Compatible solvent
Procedure:
WARNING
PRESSURIZED EQUIPMENT HAZARD
To reduce the risk of an injury, follow the Pressure
Relief Procedure on page 13 whenever you stop
spraying, before installing or cleaning the fluid
nozzle, and whenever you are instructed to relieve
the pressure.
1. Relieve the pressure.
2. Remove the air cap assembly.
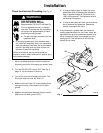
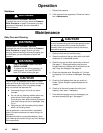
3. With the front of the gun pointed down, clean the
air cap, fluid nozzle, and front of the gun, using a
soft bristle brush and compatible solvent. See Fig.
6.
4. Carefully re-install the air cap assembly. Avoid
bending the electrode. Tighten the retaining nut
until it is snug, allowing the air cap to turn with
resistance.
5. Test the gun resistance as instructed on page 21.
Flush the Spray Gun
WARNING
ELECTRIC SHOCK HAZARD
To reduce the risk of fire, explosion, or
electric shock, turn the ES ON-OFF
lever OFF before flushing the gun.
WARNING
PRESSURIZED EQUIPMENT HAZARD
To reduce the risk of an injury, follow the Pressure
Relief Procedure on page 13 whenever you stop
spraying and whenever you are instructed to
relieve the pressure.
1. Relieve the pressure.
2. Disconnect and plug the fluid line.
3. Connect the solvent supply to the gun.
4. Flush the gun with compatible solvent into a
grounded container until it is clean.
5. Relieve the pressure.
6. Disconnect and plug the solvent line.
7. Trigger the gun into a grounded container to drain
out the solvent remaining in the gun.
8. Place the gun in its hanging bracket, with the
nozzle pointing down, until it is used again.
9. When ready to spray again, reconnect the fluid
supply line.
10. Turn on the fluid and air supplies.
11. Make sure the ES ON-OFF lever is OFF.
12. Trigger the gun until it is clear of solvent.
06622
Fig. 6