28 308018
Service
Fluid Packing and Needle Repair
The fluid packings and needle can be replaced as
individual parts or as assemblies. The overall assem-
bly is pre-adjusted at the factory.
NOTE: Before installing the packing and needle as-
sembly into the gun barrel, make sure the internal
surfaces of the barrel are clean. Remove any residue
with a soft brush or cloth. Check the inside of the
barrel for marks from high voltage arcing. If the marks
are present, replace the barrel.
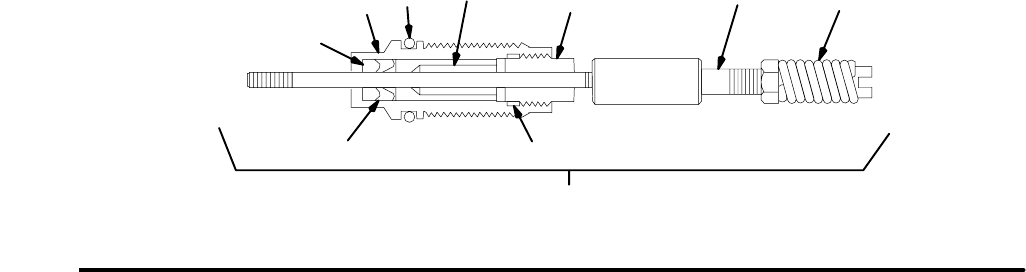
If the parts are purchased separately, assemble them
as instructed below and as shown in Fig. 17.
1. Place the packing nut (28c) and o-ring (28f) on the
fluid needle (28a). Flats on the packing nut must
be facing toward the back of the fluid needle.
2. Fill the entire inner cavity of the spacer (28h) with
petroleum jelly. Place the spacer on the fluid
needle (28a) in the direction shown in Fig. 17.
Generously apply petroleum jelly to the outside of
the spacer.
3. Place the fluid packing (28e), needle packing
(28d), and housing (28b) on the fluid needle (28a)
as shown in Fig. 17.
4. Lubricate the o-ring (28g) on the outside of the
packing housing (28b).
5. Make sure the spring (30) is installed against the
nut as shown in Fig. 17.
6. Install the packing and needle assembly into the
gun barrel. Using the multi-tool (62), tighten the
assembly until just snug, then check the drag on
the needle.
7. Tighten the packing nut to 2 lbs. (9 N) of drag force
when sliding the needle through the packing
cartridge.
8. Install the trigger (13) and tighten the trigger
screws (4).
9. Install the electrode, nozzle and resistor stud
assembly and the air cap assembly as instructed
on page 25.
10. Test the gun resistance as instructed on page 21.
03559
Fig. 17
28g
30
28
28b
28c
28d
28e
28f
28a
28h
Item 30 is not included with the Packing/Needle Assy. (28)


