


308018 9
Installation
Installing the System
WARNING
FIRE, EXPLOSION, AND
ELECTRIC SHOCK HAZARD
Installing and servicing this equipment
requires access to parts which may
cause electric shock or other serious
injury if work is not performed properly.
D Do not install or service this equip-
ment unless you are trained and
qualified.
D Be sure your installation complies with National,
State and Local codes for the installation of
electrical apparatus in a Class I, Group D
Hazardous Location.
D Comply with all applicable local, state, and
national fire, electrical, and other safety regula-
tions.
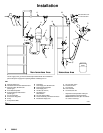
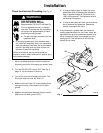
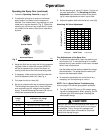
Fig. 1 shows a typical electrostatic air spray system.
It is not an actual system design. The particular type
and size system for your operation must be custom
designed for your needs. For assistance in designing a
system, contact your Graco distributor.
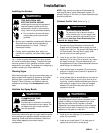
Warning Signs
Mount warning signs in the spray area where they can
easily be seen and read by all operators. An English
Warning Sign is provided with the gun. Additional
English, French, German, and Spanish signs are
available at no charge. See Accessories to order
them.
Ventilate the Spray Booth
WARNING
FLAMMABLE OR TOXIC
VAPOR HAZARD
Provide fresh air ventilation to avoid the
buildup of flammable or toxic vapors. Do
not operate the gun unless ventilation
fans are operating.
Electrically interlock the gun air supply with the ventila-
tors to prevent gun operation without ventilating fans
operating. Check and follow all National, State, and
Local codes regarding air exhaust velocity
requirements.
NOTE: High velocity air exhaust will decrease the
operating efficiency of the electrostatic system. Air
exhaust velocity of 100 ft/min (31 linear meters/minute)
should be sufficient.
Connect the Air Line (Refer to Fig. 1)
WARNING
ELECTRIC SHOCK HAZARD
To reduce the risk of electric shock or
other serious injury, the air supply hose
must be electrically connected to a true
earth ground. Use Only Graco Electrically Con-
ductive Air Supply Hose.
1. Connect the Graco Electrically Conductive Air
Supply Hose (R) between the air supply line and
the gun’s air inlet (V). The gun air inlet fitting has a
left hand thread. Connect the air supply hose
ground wire to a true earth ground.
2. Install an air line filter (O) and an air and water
separator (D) on the air line to ensure a dry, clean
air supply to the gun. Dirt and moisture can ruin
the appearance of your finished workpiece and can
cause the gun to malfunction.
3. Install a bleed-type air regulator (G) on the pump
and gun air supply lines to control air pressure to
the pump and gun.
4. Install a bleed-type air shutoff valve on the main air
line (C) and the pump air line (E) to shut off air to
the pump. Install an additional bleed-type valve on
each pump air supply line to relieve air trapped
between this valve and the pump after the air
regulator is shut off.
WARNING
PRESSURIZED EQUIPMENT HAZARD
The bleed-type air shutoff valve is required in your
system to relieve air trapped between this valve
and the pump after the air regulator is closed.
Trapped air can cause the pump to cycle unexpect-
edly, which could result in serious injury, including
splashing in the eyes or on the skin.
5. Install an air line lubricator (F) as close to the
pump (H) as possible.
6. Install an air shutoff valve ( P) on each gun air
supply line to shut off air to the gun(s).