


Service
20 311052E
Service
Items Needed for Service
• 1/16 in. Hex Wrench - provided
•3 mm Hex Wrench
• Adjustable Wrench
•4 mm Hex Wrench
• 5/16 in. Nut Driver
• Pliers
• Lubricant part no. 111265; see Accessories, page
34, to order
• Compatible Solvent
Disassembly
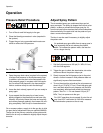
1. Perform Pressure Relief Procedure, page 12.
2. Unscrew the four screws (17) and remove the gun
from the manifold.
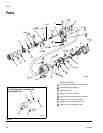
3. Unscrew the air cap retainer (8). Remove the air cap
(30) and spray tip (9). See F
IG. 17.
Model 288053: Unscrew the air cap (30). Remove
the RAC spray tip (9) and RAC housing (11). See
Parts, page 25.
4. Inspect the tip seal (9a) in place. If damaged,
replace the tip seal.
5. Remove the cap (27) from the piston housing (1).
Remove the springs (28 and 29).
6. Using the supplied wrench (38), loosen the fluid
needle setscrew (19). Remove the needle stop (21).
7. Trigger the gun (or remove cap (27) and springs (28,
29)) to pull the needle housing off the seat while you
unscrew the diffuser (10) from the gun body (1).
8. Unscrew the needle assembly (14) and use 5/16 in.
nut driver to pull the assembly straight out the front
of the gun.
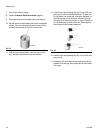
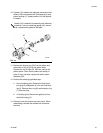
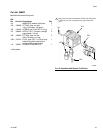
9. Remove the piston. Using a pliers, pull the piston
(20) out of the piston housing (1). See F
IG. 16.
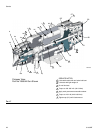
Follow the Service Notes in FIG. 17 and FIG. 18
when reassembling the gun.
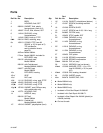
Gun repair kits are available. See page 34. Refer-
ence numbers marked with an asterisk (*) in the
service procedures are included with the 288171
Air Seal Repair Kit. Reference numbers marked
with a symbol (†) in the service procedures are
included with the 288136 Fluid Repair Kit.
CAUTION
Be sure to keep the needle straight when removing it
from the gun. If the needle is bent, it must be
replaced.