


G1006/7 Heavy Duty Mill/Drill
-17-
Assembly
Most of your Model G1006/G1007 has been
assembled at the factory, but some parts must
be assembled or installed after delivery. We
have organized the assembly process into steps.
Please follow along in the order presented here.
Drilling Angle Vise
The drilling angle vise provided with your Mill/Drill
attaches to the table with a table clamping kit.
Table clamping kits are available through the
Grizzly Catalog and must be purchased sepa-
rately. See Accessories on Page 28. This table
will accept
1
/2" bolt clamping kits (G1076).
You can mount the drilling angle vise almost any-
where on the table, and it provides a myriad of
uses when drilling.
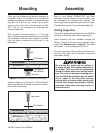
Mounting
Once you have determined that the inventory is
complete, mount the machine to a workbench
through the holes in the base. It is recommended
that you cut a hole in your bench top to allow
access to the under side of the base on the Mill/
Drill. This will be necessary for adjusting the
Y-plane leadscrew.
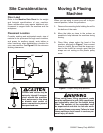
The strongest mounting option is a "Through
Mount" where holes are drilled all the way through
the workbench, and hex bolts, washers, and hex
nuts are used to secure the drill press to the
workbench.
-ACHINE"ASE
7ORKBENCH
7dai
;aViLVh]Zg
;aViLVh]Zg
AdX`LVh]Zg
=ZmCji
Figure 8. Example of a through mount setup.
-ACHINE"ASE
7ORKBENCH
AV\HXgZl
;aViLVh]Zg
Figure 9. Example of a direct mount setup.
Another option for mounting is a "Direct Mount"
where the machine is simply secured to the work-
bench with a lag screw.
Do not use the angle vise for milling. It
is made strictly for holding materials to
be drilled. This vise will not adequately
clamp an object safely for a milling opera-
tion. There is not enough clamping pres-
sure available and objects may be pulled
out or upset in the vise jaws causing
cutting tools to break and/or parts to be
thrown. Any attempt to perform a milling
operation using this vise may result in
personal injury.