


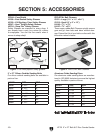
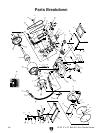


H7761 2" x 27" Belt & 6" Disc Combo Sander
-23-
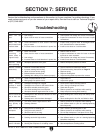
SYMPTOM POSSIBLE CAUSE CORRECTIVE ACTION
Motor will not
start.
1. Low voltage.
2. Open circuit in motor or loose connections.
1. Check power line voltage and correct if necessary.
2. Inspect all connections on motor for loose or open
connections.
Motor will not
start; fuses/circuit
breakers blow.
1. Loose connections or short circuit in line cord,
plug, or motor.
2. Incorrect fuses or circuit breakers in power line.
1. Inspect cord, plug and motor for damaged insula
-
tion, shorted wires or loose terminals.
2. Install correct fuses or circuit breakers.
Motor stalls
(resulting in
blown fuses or
tripped circuit).
1. Motor overloaded.
2. Short circuit in motor or loose connections.
3. Low voltage.
4. Incorrect fuses or circuit breakers in power line.
1. Reduce load on motor.
2. Inspect connections on motor for loose or shorted
terminals or worn insulation.
3. Check power line voltage and correct if necessary.
4. Install correct fuses or circuit breakers.
Machine slows
when operating.
1. Workpiece pressure is too great. 1. Reduce workpiece pressure on wheel.
Machine vibrates
excessively.
1. Machine not mounted securely.
2. Incorrect sanding belt tracking.
3. Weak or broken tension spring.
4. Broken/defective sanding belt.
5. Sanding disc rubbing or not centered properly.
1. Secure machine to benchtop or stand.
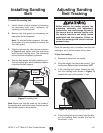
2. Follow belt tracking instructions on Page 1
5.
3. Replace spring.
4. Replace sanding belt.
5. Adjust sanding table to prevent disc contact.
Sanded surface
not square.
1. Table not perpendicular to disc.
2. Miter gauge not square to disc.
1. Adjust table tilt.
2. Adjust miter gauge.
Deep sanding
grooves or scars
in workpiece.
1. Sandpaper damaged or clogged.
1. Sandpaper too coarse for the desired finish.
2. Workpiece sanded across the grain.
3. Too much sanding force on workpiece.
4. Workpiece held still against the belt or disc.
1. Clean and/or replace sanding surface.
1. Use a finer grit sanding belt or disc.
2. Sand with the grain.
3. Reduce pressure on workpiece while sanding.
4. Keep workpiece moving while sanding.
Grains rub off the
belt or disc eas
-
ily.
1. Sanding belt or disc has been stored in an incor
-
rect environment.
2. Sanding belt or disc has been damaged.
1. Store sanding belt or disc away from damp condi
-
tions.
2. Store sanding belt or disc flat, not folded or bent.
Sanding surfaces
clog quickly or
burn.
1. Too much pressure against belt or disc.
2. Sanding softwood.
1. Reduce pressure on workpiece while sanding.
2. Use different stock or plan on cleaning/replacing
belts frequently.
Burn marks on
workpiece.
1. Using too fine of sanding grit.
2. Using too much pressure.
3. Work held still for too long.
1. Use a coarser grit sanding belt or disc.
2. Reduce pressure on workpiece while sanding.
3. Do not keep workpiece in one place for too long.
Glazed sanding
surfaces.
1. Sanding wet stock.
2. Sanding stock with high residue.
1. Dry stock properly before sanding.
2. Use different stock or plan on cleaning/replacing
belts/discs frequently.
Workpiece kick
-
back or vibration.
1. Not supporting the workpiece against the stop.
2. Starting the workpiece on a leading corner.
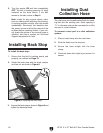
1. Use back stop to support workpiece.
2. Start workpiece on a trailing corner.
Review the troubleshooting and procedures in this section to fix your machine if a problem develops. If you
need replacement parts or you are unsure of your repair skills, then feel free to call our Technical Support
at (570) 546-9663.
SECTION 7: SERVICE
Troubleshooting