


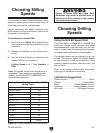
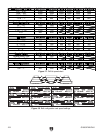

-20-
G1005Z Mill/Drill
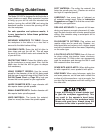
To set the depth stop:
1. Lower the tooling/bit to the required height.
2. Thread the depth nut down against the stop
bracket.
3. Lower the jam nut against the depth nut.
4. Hold the depth nut in place and tighten the
jam nut against the depth nut.
To set the spindle return distance:
1. Lower the tooling/bit.
2. Thread the return height nut up the stud to
the desired height.
Note: The scale on the depth stop can be recali
-
brated if it gets moved or has changed since the
factory setting. Refer to Depth Stop Calibration
on Page 30 for instructions on how this is done.
The Model G1005Z has a depth stop that allows
you to lower the drill bit or milling tool to the same
point every time.
The depth stop consists of a stud attached to the
quill with two hex nuts that can be lowered or
raised on the stud, so the lower nut (depth nut) hits
a stop bracket when the drill bit is lowered. The
upper nut (jam nut) is then used to tighten against
the depth nut to secure it in place, so the depth
nut doesn't move with repeated operations.
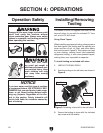
Depth Stop
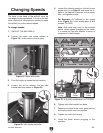
Quill Lock
The spindle can be locked in place to provide tool
stability when milling.
To lock the quill in place:
1. Lower the quill to the desired height.
2. Tighten the quill lock handle clockwise to lock
the quill in place, as shown in
Figure 14.
To unlock the quill:
1. While holding the downfeed handles, turn the
quill lock handle counterclockwise until the
quill is free to move.
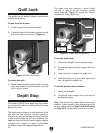
Figure 14. Quill lock handle.
The depth stop also features a return height
nut that is used to set the minimum spindle
return distance.
Figure 15 shows the various
components of the depth stop.
Figure 15. Depth stop components.
Calibration
Nut
Depth Stop
Bracket
Depth Nut
Jam Nut
Return
Height Nut