


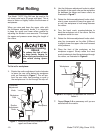

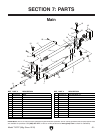

Model T10727 (Mfg. Since 12/12)
-15-
Once you have the necessary workpiece length,
follow the steps below to create the cylinder.
Note: The method for creating a specific radius
for a cylinder is a trial-and-error process. Due to
the many variations among metal workpieces,
no single positioning will create the same curve
on all materials. We recommend that you experi-
ment with scrap material before using the actual
workpiece until you find the settings that will
achieve your desired cylinder.
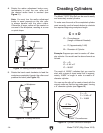
To create a cylinder:
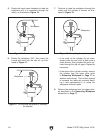
1. Use the thickness adjustment knobs to adjust
the height of the upper roller so that you can
place the workpiece between the upper and
lower rollers, as illustrated in Figure 14.
Workpiece
CW
Figure 14. Workpiece positioned for creating a
cylinder.
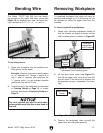
Workpiece
CCW
Figure 15. Initial cylinder bend.
2. Turn the thickness adjustment knobs clock-
wise to lower the upper roller until the
workpiece is held snug between the rollers.
Be sure to turn the thickness adjust knobs
equal amounts to keep the space and pres-
sure between the rollers even.
3. Rotate the hand crank clockwise to feed the
workpiece until it is approximately half way
through the rollers.
4. Rotate the radius adjustment knobs coun-
terclockwise to raise the rear roller for the
desired cylinder radius, as illustrated in
Figure 15.
Note: You must turn the radius adjustment
knobs in equal amounts so the rear roller
is always parallel with the other rollers.
Otherwise, a larger radius will be created
on one end of the workpiece than the other,
resulting in a cone or spiral shape.
In the following step, always err on the
side of making the cylinder too large rather
than too small. It is easy to decrease the
radius of a cylinder later, but very difficult
to increase the radius.