Page 18 For technical questions, please call 1-800-444-3353. SKU 98871
SAFETY SERVICEBASIC WELDING WELDING TIPSSETUP
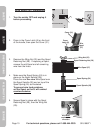
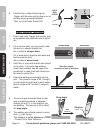
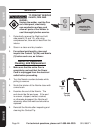
6. Hold the Gun, without touching the
Trigger, with the wire and tip clearly out of
the way of any grounded objects.
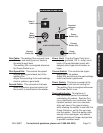
Then, turn the Power Switch ON.
Basic Welding Technique
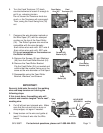
Press (and hold) Trigger and contact area 1.
to be welded with electrode wire to ignite
arc.
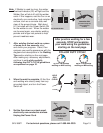
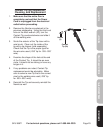
2. For a narrow weld, you can usually draw
the wire in a steady straight line,
this is called a .
For a wider weld, draw the wire back and
forth across the joint,
this is called a .
Hold Gun in one hand and the face shield 3.
in the other. If a hands-free welding
shield (not included, see #6, page 4 for
guidelines) is used, then both hands can
be used to control Gun.
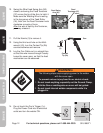
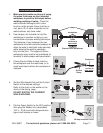
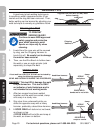
4. Direct the welding wire straight into the
joint. This gives an angle of 90° (straight
up and down) for butt (end to end) welds,
andanangleof45°forllet(T-shaped)
welds.
5. The end of gun should be tilted so that
wire is angled anywhere in-between
straight on and 15° in the direction you
are welding. The amount of tilt is called
the .
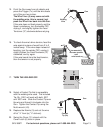
The welding wire should extend no more 6.
than
1
/
2
” past the tip.
This distance is called or CTWD
- Contact Tip to Work Distance.
90 AMP FLUX WIRE WELDER
120 V~
60 Hz
Gun
WIRE-FEED SPEED
0
1
2
3
4
5
6
7
8
9
10
MAX
MIN
ON
OFF
HOLD
GUN
CLEAR
stringer bead weave bead
Weld Gun angles,
viewed from front of weld joint.
45°
llet weld joint
90°
butt weld joint
Stickout
(up to
1
/
2
”)
Weld
Direction
Drag Angle
0-15°


