12-5
Charging the Battery
The base provides power to the Dolphin terminals and allows the
charging of the batteries in the terminals. The battery of each terminal
charges in 6 hours for the standard 3.7V battery or 9 hours for the
extended 3.7V battery. The intelligent battery charging system incor-
porated into all Dolphin terminals prevents overcharging, which means
that Dolphin terminals may be stored in the base indefinitely without
damage to the terminals, batter y packs, or the base.
To Power a Terminal and Charge its Battery
1. Install the battery pack in the terminal; see Install the Battery on page 2-1.
2. Verify the base has power. If the Power/Dock LEDs are not illuminated, see Connecting Power to
the Net Base on page 12-4.
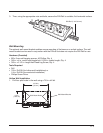
3. Slide the Dolphin terminal into one of the four terminal wells. The the Power/Dock LED for the well
changes to green. Charging begins immediately if required by the Dolphin terminal.
Make sure the terminal is dry before placing it in the Net Base. Do NOT place a wet terminal in the Net Base!
Doing so may cause damage not covered by the warranty.
We recommend use of Honeywell Li-Ion battery packs. Use of any non-Honeywell battery may result in dam-
age not covered by the warranty.
Communication
Software Requirements
Before you connect the Dolphin terminal to the Net Base, make sure you have the most current software
installed. To check the terminal’s system information, tap > Power Tools > SysInfo.
• The Kernel version must be 28.04 or later in terminals running Windows Embedded Handheld 6.5
Classic.
• In terminals running Windows CE 5.0, the kernel version must be 23.08 Service Pack 8 or later.
Applications on the Dolphin Terminal
Applications running on the Dolphin terminal when it is connected to the Net Base should be designed
specifically for a partially connected network. For more details, please refer to the Best Practices for Par-
tially Connected Networks document available at www.honeywellaidc.com.
Connecting the Dolphin Terminal to the Net Base
By default, the Dolphin terminal is configured to obtain IP addresses automatically using a DHCP server.
This means that in most cases, you would simply plug-and-play the unit.
1. Verify the base has power. If the Power/Dock LEDs are not illuminated, see Connecting Power to
the Net Base on page 12-4.
2. Plug the CAT-5 Ethernet cable into one of the RJ45 connectors on the back of the Net Base.
3. Plug the Ethernet cable into the network.
!
!


