


13
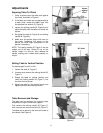
Lateral (X Axis)
Use the handle (A, Figure 12) to move the head
right or left. The lateral stops should be set in
accordance with the length of the mortise cut
(see “Setting Lateral Stops”).
Up/Down (Z Axis)
Handle B, Figure 12.
Forward/Backward (Y Axis)
Loosen the Y-Axis locking handle (shown in
Figure 18) and move the handle (C, Figure 12).
NOTE: When making lateral cuts the Y-Axis
locking handle (Figure 18) should be tightened.
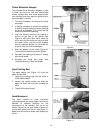
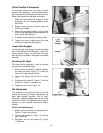
Clamp
The clamp (Figure 13) has a quick release
feature; push the handle forward to move the
jaw against the workpiece, then further tighten
the clamp by rotating the handle. The clamp jaw
can also be retracted by loosening the handle
about a half turn, and then pulling it outward.
The clamp can be swiveled for tapered
workpieces. Loosen both screws (one is shown
in Figure 13) and swivel the clamp as needed.
Re-tighten both screws.
If you do not wish to mar a soft workpiece, you
can mount a board to the face of the clamp jaw,
using screws (not provided) through the two
holes in the jaw.
Stock Stop
The stock stop, shown in Figure 13, is useful for
repetitive cuts of the same length, and can be
mounted to either end of the fence. Loosen the
wing screws to adjust.
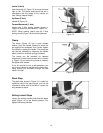
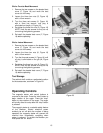
Setting Lateral Stops
Loosen the locking handles and slide the lateral
stops (Figure 14) to the desired position. Re-
tighten the locking handles.
Figure 12
Figure 13
Figure 14